


Advanced Topics
Identifying the User Agent
The User-Agent identifier includes all of the following elements:
User Agent Name
You can view or change the User-Agent name or enter additional HTTP headers for the search appliance crawler to use with the Content Sources > Web Crawl > HTTP Headers page in the Admin Console.
User Agent Email Address
For complete information about the Content Sources > Web Crawl > HTTP Headers page, click Admin Console Help > Content Sources > Web Crawl > HTTP Headers in the Admin Console.
Coverage Tuning
You can control the number of URLs the search appliance crawls for a site by using the Content Sources > Web Crawl > Coverage Tuning page in the Admin Console. To tune crawl coverage, a URL pattern and setting the maximum number of URLs to crawl for it. The URL patterns you provide must conform to the Rules for Valid URL Patterns in Administering Crawl.
For complete information about the Content Sources > Web Crawl > Coverage Tuning page, click Admin Console Help > Content Sources > Web Crawl > Coverage Tuning in the Admin Console.
Freshness Tuning
You can improve the performance of a continuous crawl using URL patterns on the Content Sources > Web Crawl > Freshness Tuning page in the Admin Console. The Content Sources > Web Crawl > Freshness Tuning page provides four categories of crawl behaviors, as described in the following table. To apply a crawl behavior, specify URL patterns for the behavior.
|
Any URL that matches one of the Crawl Frequently patterns is scheduled to be recrawled at least once every day. The minimum wait time (see Wait Times) is 15 minutes, but if you have too many URLs in Crawl Frequently patterns, wait time increases. |
|
|
Use Always Force Recrawl patterns to prevent the search appliance from crawling a URL from cache (see Determining Document Changes with If-Modified-Since Headers and the Content Checksum). |
|
For complete information about the Content Sources > Web Crawl > Freshness Tuning page, click Admin Console Help > Content Sources > Web Crawl > Freshness Tuning in the Admin Console.
Changing the Amount of Each Document that Is Indexed
You can change the default by entering an new amount of up to 10MB in Index Limits on the Index > Index Settings page.
For complete information about changing index settings on this page, click Admin Console Help > Index > Index Settings in the Admin Console.
Configuring Metadata Indexing
The search appliance has default settings for indexing metadata, including which metadata names are to be indexed, as well as how to handle multivalued metadata and date fields. You can customize the default settings or add an indexing configuration for a specific attribute by using the Index > Index Settings page. By using this page you can perform the following tasks:
For complete information about configuring metadata indexing, click Admin Console Help > Index > Index Settings in the Admin Console.
Including or Excluding Metadata Names
You might know which indexed metadata names you want to use in dynamic navigation. In this case, you can create a whitelist of names to be used by entering an RE2 regular expression that includes those names in Regular Expression and checking Include.
If you know which indexed metadata names you do not want to use in dynamic navigation, you can create a blacklist of names by entering an RE2 regular expression that includes those names in Regular Expression and selecting Exclude. Although blacklisted names do not appear in dynamic navigation options, these names are still indexed and can be searched by using the inmeta, requiredfields, and partialfields query parameters.
This option is required for dynamic navigation. For information about dynamic navigation, click Admin Console Help > Search > Search Features > Dynamic Navigation.
By default, the regular expression is ".*" and Include is selected, that is, index all metadata names and use all the names in dynamic navigation.
For complete information about creating a whitelist or blacklist of metadata names, click Admin Console Help > Index > Index Settings in the Admin Console.
Specifying Multivalued Separators
<meta name="authors" content="S. Jones, A. Garcia">
In this example, the two values (S. Jones, A. Garcia) are separated by a comma.
By using the Multivalued Separator options, you can specify multivalued separators for the default metadata indexing configuration or for a specific metadata name. Any string except an empty string is a valid multivalued separator. An empty string causes the multiple values to be treated as a single value.
For complete information about specifying multivalued separators, click Admin Console Help > Index > Index Settings in the Admin Console.
Specifying a Date Format for Metadata Date Fields
By using the Date Format menus, you can specify a date format for metadata date fields. The following example shows a date field:
<meta name="releasedOn" content="20120714">
For complete information about specifying a date format, click Admin Console Help > Index > Index Settings in the Admin Console.
Crawling over Proxy Servers
If you want the Google Search Appliance to crawl outside your internal network and include the crawled data in your index, use the Content Sources > Web Crawl > Proxy Servers page in the Admin Console. For complete information about the Content Sources > Web Crawl > Proxy Servers page, click Admin Console Help > Content Sources > Web Crawl > Proxy Servers in the Admin Console.
Preventing Crawling of Duplicate Hosts
To prevent crawling of duplicate hosts, you can specify one or more “canonical,” or standard, hosts using the Content Sources > Web Crawl > Duplicate Hosts page.
For complete information about the Content Sources > Web Crawl > Duplicate Hosts page, click Admin Console Help > Content Sources > Web Crawl > Duplicate Hosts in the Admin Console.
Enabling Infinite Space Detection
To enable infinite space detection, use the Content Sources > Web Crawl > Duplicate Hosts page.
For complete information about the Content Sources > Web Crawl > Duplicate Hosts page, click Admin Console Help > Content Sources > Web Crawl > Duplicate Hosts in the Admin Console.
Configuring Web Server Host Load Schedules
To configure a Web Server Host Load schedule, use the Content Sources > Web Crawl > Host Load Schedule page. You can also use this page to configure exceptions to the web server host load.
Regarding file system crawling: if you’ve configured the search appliance to crawl documents from a SMB file system, it only follows the configurable default value of Web Server Host Load (default to 4.0), it does not follow the Exceptions to Web Server Host Load specifically for the SMB host. Due to design constraint, the default Web Server Host Load value can only be set to 8.0 or below, or it may effect the performance of your file system crawling.
For complete information about the Content Sources > Web Crawl > Host Load Schedule page, click Admin Console Help > Content Sources > Web Crawl > Host Load Schedule in the Admin Console.
Removing Documents from the Index
To remove a document from the index, add the full URL of the document to Do Not Follow Patterns on the Content Sources > Web Crawl > Start and Block URLs page in the Admin Console.
Using Collections
For information about using the Index > Collections page to create and manage collections, click Admin Console Help > Index > Collections in the Admin Console.
Default Collection
During initial crawling, the Google Search Appliance establishes the default_collection, which contains all crawled content. You can redefine the default_collection but it is not advisable to do this because index diagnostics are organized by collection. Troubleshooting using the Index > Diagnostics > Index Diagnostics page becomes much harder if you cannot see all URLs crawled.
Changing URL Patterns in a Collection
JavaScript Crawling
|
•
|
DOM tracking to support calls, such as document.getElementById
|
Logical Redirects by Assignments to window.location
The search appliance crawls links specified by a logical redirect by assignment to window.location, which makes the web browser load a new document by using a specific URL.
The following code example shows a logical redirect by assignment to window.location.
<HTML>
<HEAD>
<SCRIPT type=’text/javascript’>
var hostName = window.location.hostname;
var u = "http://" + hostName + "/links" + "/link1.html";
window.location.replace(u);
</SCRIPT>
</HEAD>
<BODY></BODY>
</HTML>
Links and Content Added by document.write and document.writeln Functions
The search appliance crawls links and indexes content that is added to a document by document.write and document.writeln functions. These functions generate document content while the document is being parsed by the browser.
The following code example shows links added to a document by document.write.
<HTML>
<HEAD>
<SCRIPT type=’text/javascript’>
document.write(’<a href="http://foo.google.com/links/’
+ ’link2.html">link2</a>’);
document.write(
’<script>document.write(\’<a href="http://foo.google.com/links/’
+ ’link3.html">script within a script</a>\’) ;<\/script>’);
</SCRIPT>
</HEAD>
<BODY></BODY>
</HTML>
Links that are Generated by Event Handlers
The search appliance crawls links that are generated by event handlers, such as onclick and onsubmit.
The following code example shows links generated by event handlers in an anchor and a div tag.
<HTML>
<HEAD>
<SCRIPT type=’text/javascript’>
function openlink(id) {
window.location.href = "/links/link" + id + ".html";
}
</SCRIPT>
</HEAD>
<BODY>
<a onclick="openlink(’4’);" href="#">attribute anchor 1</a>
<div onclick="openlink(’5’);">attribute anchor 2</div>
</BODY>
</HTML>
Links that are JavaScript Pseudo-URLs
The search appliance crawls links that include JavaScript code and use the javascript: pseudoprotocol specifier.
The following code example shows a link that is JavaScript pseudo-URL.
<HTML>
<HEAD>
<SCRIPT type=’text/javascript’>
function openlink(id) {
window.location.href = "/links/link" + id + ".html";
}
</SCRIPT>
</HEAD>
<BODY>
<a href="javascript:openlink(’6’)">JavaScript URL</a>
</BODY>
</HTML>
Links with an onclick Return Value
<HTML>
<HEAD></HEAD>
<BODY>
<a href="http://bad.com" onclick="return false;">This link will not be crawled</a>
<a href="http://good.com" onclick="return true;">This link will be crawled</a>
</BODY>
</HTML>
Indexing Content Added by document.write/writeln Calls
Any content added to the document by document.write/writeln calls (as shown in the following example) will be indexed as a part of the original document.
<HTML>
<HEAD>
<SCRIPT type=’text/javascript’>
document.write(’<P>This text will be indexed.</P>’);
</SCRIPT>
</HEAD>
<BODY></BODY>
</HTML>
Discovering and Indexing Entities
Additionally, by default, entity recognition extracts and stores full URLs in the index. This includes both document URLs and plain text URLs that appear in documents. So you can match specific URLs with entity recognition and add them to dynamic navigation, enabling users to browse search results by full or partial URL. For details about this scenario, see Use Case: Matching URLs for Dynamic Navigation.
The Index > Entity Recognition page enables you to specify the entities that you want the search appliance to discover in your documents. If you want to identify terms that should not be stored in the index, you can upload the terms in an entity blacklist file.
Creating Dictionaries and Composite Entities
Before you can specify entities on the Index > Entity Recognition page, you must define each entity by creating dictionaries of terms and regular expressions. Dictionaries for terms are required for entity recognition. Dictionaries enable entity recognition to annotate entities, that is, to discover specific entities in the content and annotate them as entities.
Entity recognition accepts dictionaries in either TXT or XML format.
A composite entity is written as an LL1 grammar.
The search appliance provides sample dictionaries and composite entities, as shown on the Index > Entity Recognition page.
Setting Up Entity Recognition
For complete information about setting up entity recognition, click Admin Console Help > Index > Entity Recognition in the Admin Console.
Use Case: Matching URLs for Dynamic Navigation
http://www.mycompany.com/services/...
http://www.mycompany.com/policies/...
http://www.mycompany.com/history/...
Creating an XML Dictionary that Defines an Entity for Matching URLs
<?xml version="1.0"?>
<instances>
<instance>
<name>services</name>
<pattern>http://.*/services.*</pattern>
<store_regex_or_name>name</store_regex_or_name>
</instance>
<instance>
<name>policies</name>
<pattern>http://.*/policies/.*</pattern>
<store_regex_or_name>name</store_regex_or_name>
</instance>
<instance>
<name>history</name>
<pattern>http://.*/history/.*</pattern>
<store_regex_or_name>name</store_regex_or_name>
</instance>
</instances>
Note: You must create an instance for each type of URL that you want to match.
Creating an XML Dictionary that Defines an Entity for Capturing the Name from the URL
<?xml version="1.0"?>
<instances>
<instance>
<name> Anything - will not be used </name>
<pattern> http://www.mycompany.com/(\w+)/[^\s]+ </pattern>
<store_regex_or_name> regex_tagged_as_first_group </store_regex_or_name>
</instance>
</instances>
There are two important things to note about this example:
Adding the Entity to Entity Recognition
Add a new entity, which is defined by the dictionary:
|
1.
|
Click Index > Entity Recognition > Simple Entities.
|
|
2.
|
On the Simple Entities tab, enter the name of the entity in the Entity name field, for example "type-of-doc.”
|
|
3.
|
Click Choose File to navigate to the dictionary file in its location and select it.
|
|
4.
|
|
5.
|
|
6.
|
Click Upload.
|
|
7.
|
(Optional) Click Entity Diagnostics to test that everything works.
|
Adding the Entity to Dynamic Navigation
To show URLs as dynamic navigation options, add the entity:
|
1.
|
Click Search > Search Features > Dynamic Navigation.
|
|
2.
|
|
3.
|
In the Name box, type a name for the new configuration, for example “domains.”
|
|
4.
|
|
5.
|
In the Display Label box, enter the name you want to appear in the search results, for example “TypeOfUrl.” This name can be different from the name of the entity.
|
|
6.
|
From the Attribute Name drop-down menu, select the name of the entity that you created, for example “type-of-doc.”
|
|
7.
|
From the Type drop-down menu, select STRING.
|
|
9.
|
Click OK.
|
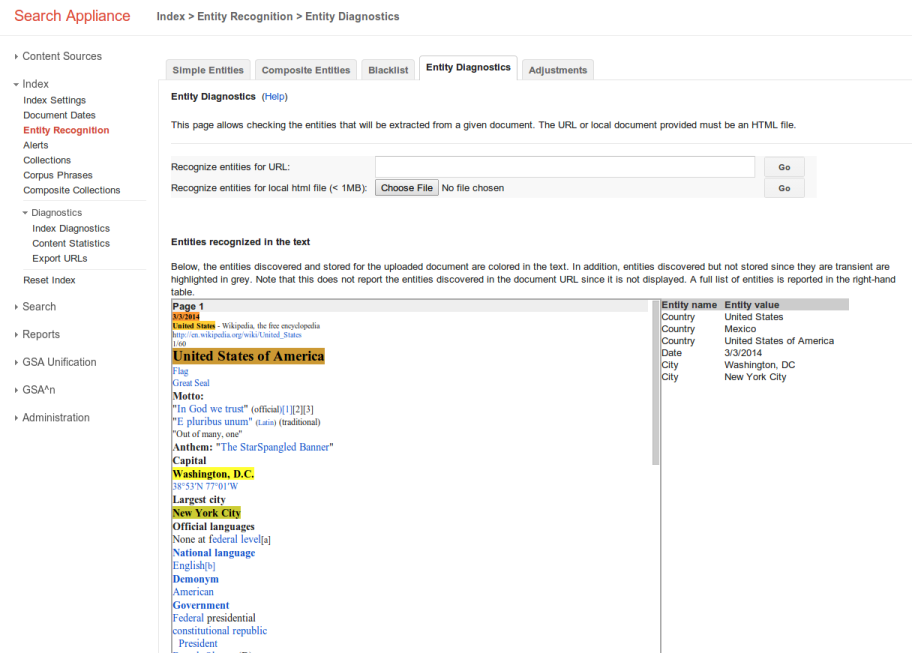
Viewing URLs in the Search Results

However, take note that entity recognition only runs on documents that are added to the index after you enable entity recognition. Documents already in the index are not affected. To run entity recognition on documents already in the index, force the search appliance to recrawl URL patterns by using the Index > Diagnostics > Index Diagnostics page.
Use Case: Testing Entity Recognition for Non-HTML Documents
This use case describes how you can test your entity recognition configuration on an indexed document that is not in HTML format. To run entity diagnostics on HTML documents, use the Index > Entity Recognition > Entity Diagnostics page in the Admin Console.
Testing Entity Recognition on a Cached Non-HTML Document
Note: This procedure does not affect the crawl and indexing of a URL
|
1.
|
Click Index > Diagnostics > Index Diagnostics.
|
|
2.
|
Click List format.
|
|
3.
|
Under All hosts, click the URL of the document that you want to test.
|
|
4.
|

Note: The Open in entity diagnostics link is only available for public documents.
Wildcard Indexing
Wildcard search enables your users to enter queries that contain substitution patterns rather than exact spellings of terms. Wildcard indexing makes words in your content available for wildcard search.
To disable or enable wildcard indexing or the change the type of wildcard indexing, use the Index > Index Settings page in the Admin Console. For more information about wildcard indexing, click Admin Console Help > Index > Index Settings.
By default, wildcard search is enabled for each front end of the search appliance. You can disable or enable wildcard search for one or more front ends by using the Filters tab of the Search > Search Features > Front Ends page. Take note that wildcard search is not supported with Chinese, Japanese, Korean, or Thai. For more information about wildcard search, click Admin Console Help > Search > Search Features > Front Ends > Filters.