


Customizing the User Interface
What Is the Google Search Appliance User Interface?
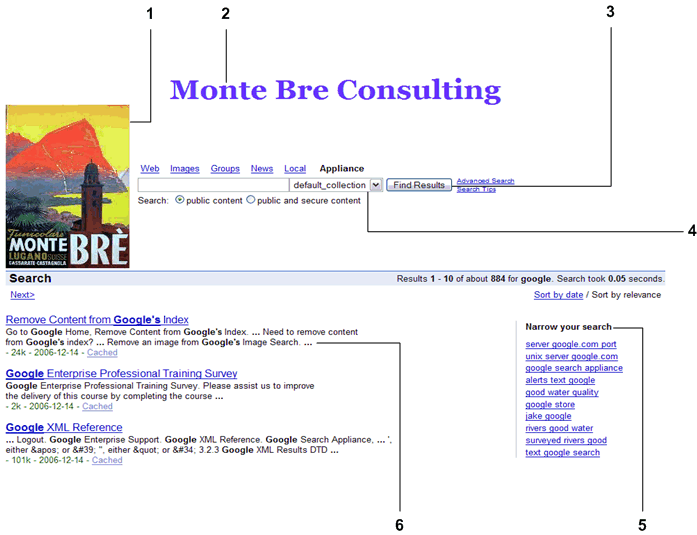
![]() By default, the search appliance offers a user interface that is simple and intuitive, like Google.com. As a search appliance administrator, you can use the default user interface as the basis for customizing one or more user interfaces that focus on your end users.
By default, the search appliance offers a user interface that is simple and intuitive, like Google.com. As a search appliance administrator, you can use the default user interface as the basis for customizing one or more user interfaces that focus on your end users.
For customers, you want a user interface that:
For employees, you a want user interface that:
For customers, you will create the following user interfaces:
For employees, you will create the following user interfaces:
|
How you can customize the user interface using the Page Layout Helper |
|
|
What guidelines you should follow when customizing the user interface |
What Is the Relationship Between a User Interface and a Front End?
For more information about front ends, refer to Managing the Search Experience.
You can use a customized front end with a specific collection to help improve searches and enhance results, as described in Using Collections with Front Ends.
Creating a Front End
You create a front end using the Search > Search Features > Front Ends page in the Admin Console.
|
1.
|
Click Search > Search Features > Front Ends.
|
|
2.
|
Enter a name for the front end in the Front End Name box.
|
|
3.
|
Click Create New Front End.
|
To edit the front end, click the Edit link for the front end.
Using Front End Search Parameters
When an end user searches for information using a front end, the Web browser sends the search request to the Google Search Appliance as a URL that contains a query string. In this query string, the front end's user interface is defined by the &proxystylesheet search parameter. Other elements of a front end are defined by the &client search parameter. You can mix and match the &proxystylesheet and &client search parameter values to accommodate different presentations of the same results. For complete information about using search parameters, refer to the Search Protocol Reference.
What Is the Relationship Between a User Interface and an XSLT Stylesheet?
What Tools Can I Use to Customize a User Interface?
However, after you save changes in the XSLT Stylesheet Editor, you cannot return to using the Page Layout Helper. It is automatically disabled. For more information about using both tools to customize a user interface, refer to Customization Process Overview.
For information about the Page Layout Helper, refer to Working with the Page Layout Helper. For information about the XSLT Stylesheet Editor, refer to Working with the XSLT Stylesheet Editor.
Another source of tools for user interface development is the Google Gadgets page (https://developers.google.com/gadgets/). You might consider creating a Google Gadget as a user interface for enterprise search. For example, you might create a Google Gadget search box for end users to add to their desktops. This gadget would enable end users to start a search from the search box on the desktop rather than the search page.
Google Gadgets are not supported.
What Knowledge Do I Need to Customize a User Interface?
Even if you do not have any special knowledge of XSLT, you can effectively customize a Google Search Appliance user interface using the Page Layout Helper. However, if you want to add a custom header or footer (see Adding a Header and Footer) to your user interface using the Page Layout Helper, you add snippets of HTML code. In this instance, some knowledge of HTML is required.
Getting Started with Customizing the User Interface
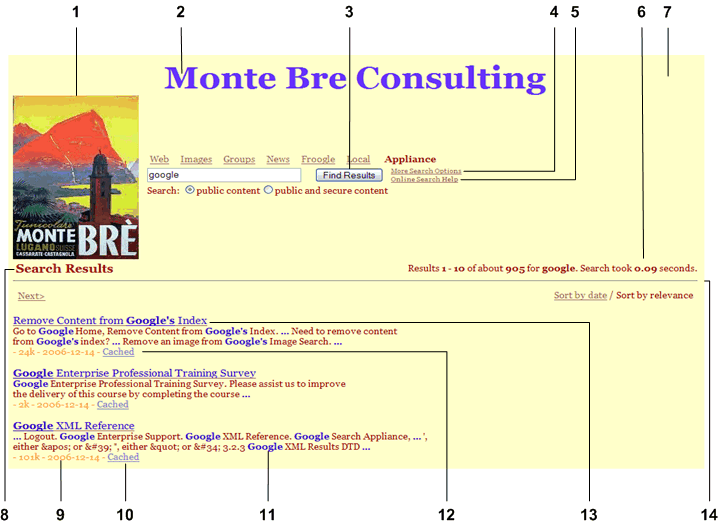
The default user interface for the search appliance includes Google-specific elements, such as the Google logo and the Google Search button. For illustrations of the default user interface, refer to Starting with a Basic Search Experience.
|
Changed search button text from Google Search to Find Results. |
|
Working with the Page Layout Helper
The Page Layout Helper has the following three sections:
Opening the Page Layout Helper
The Page Layout Helper appears on the Search > Search Features > Front Ends > Output Format page in the Admin Console. Before you can use the Page Layout Helper, you must create a front end. For information, refer to Creating a Front End.
To open the Page Layout Helper:
|
1.
|
Choose Search > Search Features > Front Ends.
|
|
2.
|
|
3.
|
In the Page Layout Helper box, select the section that you want to edit.
|
Previewing and Saving Changes
The Page Layout Helper Preview button opens a browser window to let you see how the page will look when you save your changes. Changes are not saved until you click the Save button.
A new window opens each time you click Preview. You can close these windows as you finish looking at them. When you click the Save button, the changes you made in any open section are saved to the XSLT stylesheet. All changes are optional.
You can also view your customizations in a browser window. For details, refer to Viewing User Interface Changes in a Browser Window.
Customizing Global Attributes
Global attributes are elements that appear on all user interface pages. The Global Attributes section of the Page Layout Helper enables you to make the following changes to user interface pages:
Changing the Logo
By default, the Google logo appears on the search page, the search results page, the advanced search page, and the search within results page. As shown in the search result page figure (see Getting Started with Customizing the User Interface), you can replace the Google logo with your organization's logo. You can also remove any logo from user interface pages.
|
2.
|
Click the right arrow next to Global Attributes to display the contents.
|
|
5.
|
Click Save.
|
Changing the Font Face
The global font face is used for all text on all user interface pages. By default, the global font face is Arial, sans-serif, as shown in the search result page figure (see Getting Started with Customizing the User Interface). You can change the global font face using the Page Layout Helper. To change font sizes, font colors, or font faces for individual user interface elements, use the XSLT Stylesheet Editor (see Customizing the User Interface in the XSLT Stylesheet).
To change the global font face:
|
2.
|
Click the right arrow next to Global Attributes to display the contents.
|
|
4.
|
Click Save.
|
Adding a Header and Footer
Your organization's web site may achieve a uniform look by using a standard header and footer on its pages. If so, you might want to maintain this look on the search appliance user interface. If pages on your organization's web site use a standard header and footer, you can add them to the search appliance user interface. The search result page figure (see Getting Started with Customizing the User Interface) includes a standard page header.
To add a header and/or footer:
|
2.
|
Click the right arrow next to Global Attributes to display the contents.
|
|
3.
|
Paste your web site's header code in the Header area.
|
|
4.
|
Paste your web site's footer code in the Footer area.
|
|
5.
|
Click Save.
|
Customizing the Search Box
The Search Box section of the Page Layout Helper enables you to change the following elements:
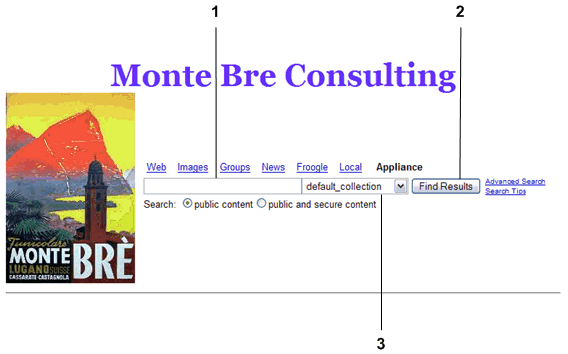
The following figure shows a search box that has been customized using the Page Layout Helper.
Changing the Search Box and Button
By default, the search box length accommodates 32 characters, but it scrolls to allow longer queries. The search button label reads “Google Search.” As shown in the search box figure (see Customizing the Search Box), you can change the search box length and the search button text. You can also replace the search button with an image.
To change the search box and button:
|
2.
|
Click the right arrow next to Search Box to display the contents.
|
|
4.
|
|
5.
|
To use another image to replace the search button, click the Use image option and enter the complete URL to the image.
|
|
6.
|
Click Save.
|
Adding a Menu to Search by Collection
A collection is a subset of the complete search index. If you include a menu to search by collection, you enable end users to narrow their searches. The search box figure (see Customizing the Search Box) includes a menu to search by collection. By default, the search box does not have a menu to search by collection.
To add a menu to search by collection:
|
2.
|
Click the right arrow next to Search Box to display the contents.
|
|
3.
|
|
4.
|
Click Save.
|
|
2.
|
Click the right arrow next to Search Box to display the contents.
|
|
3.
|
Deselect the Collections checkbox.
|
|
4.
|
Click Save.
|
|
5.
|
Select the Collections checkbox.
|
|
6.
|
Click Save.
|
For more information about collections, refer to Using Collections with Front Ends.
Disabling Public and Secure Search Radio Buttons
By default, the Secure Search option is enabled, letting your users choose to search over public documents or both public and secure documents. By default, a search box contains radio buttons for public and secure search as shown in the search box figure (see Customizing the Search Box). If you do not want these radio buttons to appear in the user interface, you can disable them.
To disable public and secure search radio buttons:
|
2.
|
Click the right arrow next to Search Box to display the contents.
|
|
3.
|
Click the checkbox to disable the display of the Secure search option.
|
|
4.
|
Click Save.
|
Modifying Search Results
Using the Page Layout Helper, you can change the following elements on the search results page:
Changing Page Top Elements
Elements that can appear at the top of a search results page include:
|
•
|
By default, all these elements appear at the top of a search results page, as shown in the search result page figure (see Getting Started with Customizing the User Interface).
Using the Page Layout Helper, you can choose which page top elements you want to show or hide. To change text labels for the Advanced Search link or Search Tips link, use the XSLT Stylesheet Editor (see Customizing the User Interface in the XSLT Stylesheet).
|
2.
|
Click the right arrow next to Search Results to display the contents.
|
|
3.
|
Click the check boxes to show or hide the Logo, Advanced Search link, Search Tips link, or search box (top).
|
|
4.
|
When finished, click Save.
|
Changing the Page Divider
A search results page can include a page divider. The divider can be a blue bar with search information or a gray line. By default, the page divider is a blue bar with search information, as shown in the search result page figure (see Getting Started with Customizing the User Interface).
Using the Page Layout Helper, you can choose whether to use a divider or not and which divider you want to use. To change text labels for Search Information, use the XSLT Stylesheet Editor (see Customizing the User Interface in the XSLT Stylesheet).
To change the search information and page divider:
|
2.
|
Click the right arrow next to Search Results to display the contents.
|
|
3.
|
Click the Search information check box to show or hide search information.
|
|
4.
|
|
5.
|
When finished, click Save.
|
Changing Page Top Navigation Links
A search results page can include the following navigation links at the top of results listings:
|
•
|
Previous/Next link
|
By default, the search results page includes both of these navigation links, as shown in the search result page figure (see Getting Started with Customizing the User Interface).
Using the Page Layout Helper, you can choose whether to show or hide one or both of these navigation links. To change text labels for navigation links, use the XSLT Stylesheet Editor (see Customizing the User Interface in the XSLT Stylesheet).
|
2.
|
Click the right arrow next to Search Results to display the contents.
|
|
3.
|
Click the check boxes to show or hide the Previous/Next link or the Sort by Date/Sort by Relevance link.
|
|
4.
|
When finished, click Save.
|
Changing Dynamic Result Clusters
Dynamic result clusters are keywords that are based on the results of each search query. Each keyword groups similar documents together. For information about dynamic result clusters, refer to Narrowing Searches.
To change dynamic result clusters attributes:
|
2.
|
Click the right arrow next to Search Results to display the contents.
|
|
3.
|
Click the check box to show or hide Dynamic result clusters.
|
|
4.
|
|
5.
|
When finished, click Save.
|
Changing Dynamic Navigation
Dynamic navigation helps users explore search results by using specific metadata attributes. For information about dynamic navigation, refer to Using Dynamic Navigation to Help Users Explore Results.
|
2.
|
Click the right arrow next to Search Results to display the contents.
|
|
3.
|
Click the check box to Show Dynamic Navigation.
|
|
4.
|
When finished, click Save.
|
Changing Sidebar Elements
Sidebar elements include search results from Google Apps or Google Site Search. By default, the search results page does not display sidebar elements. Using the Page Layout Helper, you can choose whether to hide or show sidebar elements. You cannot show sidebar elements along with dynamic navigation or dynamic result clusters side view.
To show results from Google Apps, you must enable indexing public content or integrating personal content by using the Content Sources > Google Apps page. To show results from Google Site Search, you must provide a search engine identifier.
|
2.
|
Click the right arrow next to Search Results to display the contents.
|
|
4.
|
When finished, click Save.
|
Changing Result Listing Elements
Each result listing on a search results page can include the following elements:
|
•
|
|
•
|
By default, the search results page includes all of these elements. The search result page figure (see Getting Started with Customizing the User Interface) includes most of these elements, but omits the URL.
Using the Page Layout Helper, you can choose whether to show or hide any of these result listing elements. To change other aspects of these elements, such as font color, use the XSLT Stylesheet Editor (see Customizing the User Interface in the XSLT Stylesheet).
To change the Search Results attributes:
|
2.
|
Click the right arrow next to Search Results to display the contents.
|
|
3.
|
|
4.
|
When finished, click Save.
|
Changing Page Bottom Elements
Elements that appear at the bottom of a search results page include:
|
•
|
Previous/Next page navigation links
|
By default, the search results page includes Google-style navigation links and a search box.
Using the Page Layout Helper, you can choose a different style of navigation link or hide the search box. To change other aspects of these elements, use the XSLT Stylesheet Editor (see Customizing the User Interface in the XSLT Stylesheet).
To change the page bottom elements:
|
2.
|
Click the right arrow next to Search Results to display the contents.
|
|
4.
|
Click the check box to show or hide the Search box (bottom).
|
|
5.
|
When finished, click Save.
|
Customizing the User Interface in the XSLT Stylesheet
|
Changed search button text from Google Search to Find Results. |
|
|
Changed the advanced search anchor text from Advanced Search to More Search Options. |
|
|
Changed search help anchor text from Search Tips to Online Search Help. |
|
|
Changed global text color and font face from Arial, sans-serif to Georgia, serif. |
|
|
Added a separate font color for separation bar standard text. |
|
Working with the XSLT Stylesheet Editor
For detailed information about the contents of the XSLT stylesheet, refer to Changing Variables in the XSLT Stylesheet.
Opening the XSLT Stylesheet Editor
The XSLT Stylesheet Editor appears on the Search > Search Features > Front Ends > Output Format page in the Admin Console. Before you can use the XSLT Stylesheet Editor, you must create a front end. If you started customizing a user interface using the Page Layout Helper, you already have a front end. For information, refer to Creating a Front End.
To open the XSLT Stylesheet Editor:
|
1.
|
Choose Search > Search Features > Front Ends.
|
|
2.
|
|
3.
|
Previewing XSLT Stylesheet Changes
When you are editing variables in the XSLT stylesheet, you should periodically preview the results of your changes and avoid saving changes until you are satisfied. When you click Save the corresponding front end is updated after 15-30 minutes. The preview pages display how the search or search results pages look with the changes you have made. However, the links and buttons on the preview page are not functional.
To see the actual search or search results pages, use the Test Center link in the blue bar at the top right of the page. To return the XSLT stylesheet to the state before it was edited, click Restore Default.
To preview changes that you make to the XSLT stylesheet:
|
2.
|
Enter any changes to the stylesheet and click Preview to review the changes.
|
|
5.
|
When finished, click Save.
|
You can also view your customizations in a browser window. For details, refer to Viewing User Interface Changes in a Browser Window.
Exporting an XSLT Stylesheet
To export the XSLT stylesheet:
|
2.
|
Click Export.
|
|
3.
|
In the File Download wizard, click OK and navigate to a location for the file.
|
The default name for the stylesheet is frontendname_frontend_stylesheet.en.xslt. You can give the exported stylesheet any name you choose.
Importing an XSLT Stylesheet
|
2.
|
Enter the filename of the edited XSLT stylesheet in the Import stylesheet box, or browse for the file.
|
|
3.
|
Click the Import button.
|
|
4.
|
Click OK.
|
|
6.
|
When finished, click Save.
|
Restoring the XSLT Stylesheet
To restore the XSLT stylesheet:
|
2.
|
Click Restore Default.
|
Changing Variables in the XSLT Stylesheet
For ease of use, the XSLT stylesheet is divided into the following sections:
<!-- **********************************************************************
Global Style variables (can be
customized): '' for using browser's default
********************************************************************** -->
<xsl:variable name="global_font">arial,sans-serif</xsl:variable>
<xsl:variable name="global_font_size"></xsl:variable>
<xsl:variable name="global_bg_color">#ffffcc</xsl:variable>
<xsl:variable name="global_text_color">#990000</xsl:variable>
<xsl:variable name="global_link_color">#996666</xsl:variable>
<xsl:variable name="global_vlink_color">#551a8b</xsl:variable>
<xsl:variable name="global_alink_color">#ff0000</xsl:variable>
Changing the Logo
The Logo setup section of the XSLT stylesheet contains variables that control the logo that appears on user interface pages. The search result page figure (see Getting Started with Customizing the User Interface) includes a custom logo.
Changing Global Style Variables
The search result page figure (see Getting Started with Customizing the User Interface) illustrates changes to the global font face, global font colors, global link colors, and page background color.
Changing Result Page Components
The Result page components section of the XSLT stylesheet contains variables that control the appearance of elements that appear at the top of the search results page. These elements include the page header, search box and button, separation bar, spelling suggestions, and so on. The search result page figure (see Getting Started with Customizing the User Interface) illustrates changes to the page header, search button, and separation bar.
|
Specify links and labels that appear in the search results page header provided by Google. |
|
|
Display spelling suggestions, change label text (Did you mean:), or color. |
|
|
Display synonym suggestions, change label text (You could also try:), or color. |
|
|
Display KeyMatches, change label text (KeyMatch), text color, or background color. |
|
Changing Result Elements
The Result elements section of the XSLT stylesheet contains variables that control the appearance of all search result listings. By editing variable values in this section, you can change the font face and color of result titles, snippets, and link URLs. The search result page figure (see Getting Started with Customizing the User Interface) illustrates changes to the result title color, keyword match color, and result cache link color.
|
Color used in result cache link, similar pages, and description |
Change the faint color used in result cache links, similar pages, and descriptions. |
Changing Other Variables
|
Specify whether to use your own page header, the provided page header, or both. The Advanced Search page contains expanded options for search queries, including Find Results keyword options, Language options, File Format options, and so on. |
|
|
Change the error message text for a server error or an unknown XML result type. |
|
|
Specify whether to show the My Alerts link on the search and results pages. |
Changing Variables in Other XSLT Stylesheet Sections
Changing the Language of the User Interface
To change the language of the user interface, use the Search > Search Features > Front Ends > Output Format page in the Admin Console. For complete information about using the Output Format page, click Admin Console Help > Search > Search Features > Front Ends > Output Format in the Admin Console.
The search appliance displays search results in the following languages:
Customization Process Overview
You may customize a user interface using both the Page Layout Helper and by editing the XSLT stylesheet directly. You must make all Page Layout changes in the boxes provided before editing the XSLT stylesheet directly. These changes are saved in the XSLT stylesheet when you click Save.
You cannot return to using the Page Layout Helper after you manually edit the XSLT stylesheet, unless you start over completely by clicking the Restore Default button. If you want to continue editing, you can do so in the XSLT Stylesheet Editor.
Here is the recommended sequence for customizing a user interface:
|
3.
|
Click Preview to view each change you make.
|
|
5.
|
When finished, click Save.
|
|
6.
|
Click Export to save the XSLT stylesheet as a backup.
|
|
7.
|
Click the Edit underlying XSLT code link.
|
|
9.
|
Click Preview to see your changes.
|
|
12.
|
Click Export to save the XSLT stylesheet as a backup.
|
|
13.
|
Test your changed search and search results pages by using the Test Center link at the upper right of the page.
|
Note: Later, you can use the Import button to use your edited XSLT stylesheet to make further changes.
Viewing User Interface Changes in a Browser Window
http://search_appliance_name/search? site=default_collection&client=
default_frontend&output=xml_no_dtd&proxystylesheet=
my_frontend&proxyreload=1&proxycustom=%3CHOME/%3E
For information about search parameters, refer to the Search Protocol Reference.
Managing Customized XSLT Stylesheets
If you customize XSLT stylesheets, make sure that you keep a backup copies offline. To back up an XSLT, export it as described in Exporting an XSLT Stylesheet. You can also export the entire configuration for a search appliance using the Administration > Import/Export page in the Admin Console.
Migrating a Customized XSLT Stylesheet to a New Software Release
In some instances, a new software release of the search appliance contains changes to the XSLT stylesheet. If you have a customized XSLT stylesheet from an earlier software release, you can migrate it to the new software release by adding any new XSLT code to it. Before you begin editing the XSLT stylesheet, ensure that you have an exported version of it. If not, export it, as described in Exporting an XSLT Stylesheet.
To migrate a customized stylesheet to a new software release:
|
1.
|
|
2.
|
|
7.
|
User Interface Design Principles
Keep Search Pages Clean, Simple, and Fast
Keep Advanced Search Separate
Make Search Ubiquitous
Make Sure the Search Box Is Big Enough
Make Sure the User Knows what Documents Have Been Searched
Make Help Easily Available
A link to a help page should be accessible near the search box.