


Best Practices
Search Experience Best Practices
Checklist of Best Practices
Personalizing the Search Experience
Users do not need to take any action to have a personalized search experience. The search appliance automatically presents a personalized search experience based on changes that you, as the system administrator, have implemented using search appliance features, including front ends (see The Relationship Between the Search Experience and Front Ends), KeyMatches (see Using KeyMatches to Guide Users to URLs), and source biasing (see Using Source Biasing).
The first step to personalizing the search experience is gathering information about the search experience (see Gathering Information about the Search Experience) as it is currently deployed on the Google Search Appliance. After gathering this information, you can analyze it and decide:
![]() In this document, descriptions of features that you can use to personalize the search experience are marked with the following personalization icon.
In this document, descriptions of features that you can use to personalize the search experience are marked with the following personalization icon.
The Relationship Between the Search Experience and Front Ends
![]() Several of the Google Search Appliance features described in this document are implemented in specific front ends. A front end is a framework that manages the search experience for specific types of end users. Features implemented in front ends include:
Several of the Google Search Appliance features described in this document are implemented in specific front ends. A front end is a framework that manages the search experience for specific types of end users. Features implemented in front ends include:
If you plan on changing anything in a front end, it is recommended that you create at least one front end to customize. For information about this task, refer to Creating a Front End.
Creating Multiple Front Ends
|
•
|
|
•
|
For more information about front ends, refer to Managing the Search Experience.
Gathering Information about the Search Experience
![]() Before you can effectively personalize the search experience, you need to have knowledge about your end users, such as their roles, functional groups, locations, what they are searching for, and whether they are finding it or not. The Google Search Appliance enables you to gather information about user clicks. From this information, you can gain knowledge about end users and their interactions with search results. Information about user clicks can tell you:
Before you can effectively personalize the search experience, you need to have knowledge about your end users, such as their roles, functional groups, locations, what they are searching for, and whether they are finding it or not. The Google Search Appliance enables you to gather information about user clicks. From this information, you can gain knowledge about end users and their interactions with search results. Information about user clicks can tell you:
The range of IP addresses tells you that the users who are searching for the results are all Engineers in the U.S. who are working on project Malta. You might create a front end for this group of users. For information about this task, refer to Creating a Front End.
For this front end, you might promote project Malta URLs to the top of the search results using KeyMatches (see Using KeyMatches to Guide Users to URLs). Another alternative for promoting these URLs is to use source biasing (see Using Source Biasing) to move the result up in the listings.
Viewing Detailed Data about User Clicks
The Google Search Appliance feature that enables you to gather information about user clicks is advanced search reporting (ASR). When advanced search reporting is enabled in the Admin Console (see Enabling Advanced Search Reporting for a Front End), you can export an advanced search report (see Exporting an Advanced Search Report). Each entry in an advanced search report represents a single user click or other action, such as page load, in the search appliance user interface.
When you enable advanced search reporting, the search appliance uses its automatic self-learning scorer (see Using the Automatic Self-Learning Scorer), which fine tunes relevance and scoring for results.
Values in Advanced Search Reports
The following example shows a complete entry in an advanced search report:
Click Types in Advanced Search Reports
The following table describes built-in click types that can appear in an advanced search report.
|
OneBox on results page (see Adding Click Types to OneBox Modules) |
|
|
Any link on the results page that does not have a defined ctype |
Adding Custom Click Types
Adding Click Types to OneBox Modules
If you have OneBox modules where you want to track user clicks, add the onebox ctype to onebox-default.xsl. To edit onebox-default.xsl, use the Content Sources > OneBox Modules page in the Admin Console or an editor of your choice.
Interpreting Detailed Data About User Clicks
|
3.
|
|
2.
|
Using Advanced Search Reporting to Personalize the Search Experience
|
1.
|
|
2.
|
|
3.
|
|
4.
|
Getting Baseline Measurements
|
2.
|
Calculating the Percentage of Satisfied Queries
The formula for calculating percentage of queries that are satisfied is:
Calculating the Average Click Rank
The formula for identifying a click rank for an individual entry is:
where click start is the page of the click
The formula for calculating average click rank is:
Analyzing User Clicks
You also might want to identify IP address ranges for most queries. This might indicate that members of a specific group of users, such as the sales department, are all searching for the same information.You might consider personalizing their search experience by creating a collection (see Segmenting Data in the Search Index) and front end (see Creating a Front End) especially for this group.
Personalizing the Search Experience Using Front Ends
Using your analyses of user clicks, you can identify ways to personalize the search experience using front ends. For an overview of ways to personalize the search experience, refer to Checklist of Best Practices.
Measuring the Effectiveness of Personalization
After you personalize the search experience, generate another advanced search report and compare with it the baseline measurements (see Getting Baseline Measurements). This comparison enables you to measure the impact that personalization has had on the search experience.
Generating an Advanced Search Report
Use the Google Search Appliance Admin Console to generate an advanced search report by:
|
•
|
Enabling Advanced Search Reporting for a Front End
You can enable or disable advanced search reporting for any front end. To enable advanced search reporting, use the Search > Search Features > Front Ends > Output Format page in the Admin Console. For complete information about using the Output Format page, refer to Admin Console Help > Search > Search Features > Front Ends > Output Format - Page Layout Helper in the Admin Console.
Exporting an Advanced Search Report
After you enable advanced search reporting for a front end, you can export an advanced search report. To export an advanced search report, use the Reports > Search Logs page in the Admin Console. For complete information about using the Search Log page, click Admin Console Help > Reports > Search Logs in the Admin Console.
You can also use the Reports > Search Reports page to view the following advanced search report data:
Using the Automatic Self-Learning Scorer
To deactivate the automatic self-learning scorer, navigate to the following URL: http://<yourMachine>:8000/EnterpriseController#a=deActivateAdvancedScoring
To activate the automatic self- learning scorer, navigate to the following URL: http://<yourMachine>:8000/EnterpriseController#a=activateAdvancedScoring
Using KeyMatches to Guide Users to URLs
![]() A document might not be in the search index or might not appear among the highest search results. However, it might be valuable to users as a search result. You can promote such documents in the results by using KeyMatches. A KeyMatch guides users to recommended links, and appear when a user enters a specific search term.
A document might not be in the search index or might not appear among the highest search results. However, it might be valuable to users as a search result. You can promote such documents in the results by using KeyMatches. A KeyMatch guides users to recommended links, and appear when a user enters a specific search term.
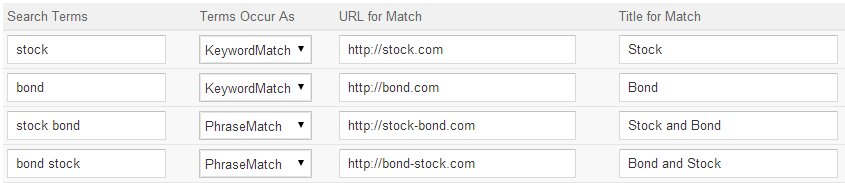
Because a KeyMatch is specific to a front end, you can aim it at specific types of end users, as shown in the following example. Suppose you administer a search appliance for an e-commerce business, mediacompany.com. This business sells DVDs online in various countries. The business maintains an e-commerce website with a home page, www.mediacompany.com, This home page contains links to pages for end users in different regions, including North America, South America, Europe and the Middle East, Asia, Australia, and Africa.
You know that when end users search for “new movies,” they are most interested in navigating to http://mediacompany.com/DVD/recentreleases. You might provide this link on top of the search results as a KeyMatch, as shown in the following figure.

|
•
|
The URL is http://mediacompany.com/DVD/recentreleases
|
You can submit any number of URLs per word, phrase, or exact match. By default, however, only a maximum of three KeyMatches are returned for a search. You can increase the maximum number of KeyMatches returned up to 50 by using the numgm query parameter, which is described in the Search Protocol Reference.
Working with KeyMatches
To work with KeyMatches, use the KeyMatch tab on the Search > Search Features > Front Ends > Output Format page in the Admin Console. For any front end, you can:
Any KeyMatch file that you import must be in UTF-8 encoding. For complete information about using the KeyMatch tab, click Admin Console Help > Search > Search Features > Front Ends > KeyMatch in the Admin Console.
Identifying KeyMatches
To identify potential KeyMatches:
|
•
|
Check results for top queries by running a report on searches that returned results using the Reports > Search Reports page in the Admin Console. Examine each query. If the best result for a query is not the first result, you might create a KeyMatch.
|
|
•
|
Check missed query terms by creating a report of unsuccessful search queries, as described in Analyzing Searches that Do Not Return Results. If several users are searching on missed query terms, you might create KeyMatches for the missed query terms.
|
Changing the Appearance of KeyMatches
|
•
|
Label text (KeyMatch)
|
For example, you might make the following changes:
|
•
|
The following figure illustrates these changes.

To make changes to the appearance of KeyMatches, edit the Result Page Component section of the XSLT stylesheet. For information about editing the XSLT stylesheet, refer to Customizing the User Interface in the XSLT Stylesheet.
Using Related Queries to Suggest Alternative Searches
Because a related query is specific to a front end, it can be aimed at a specific types of end user, as shown in the following example. In an organization, projects and products are often developed under an internal name, but launched under a different name. For example, suppose mediacompany.com develops a new MP3 player under the code name “Malta,” but releases it as “Valise.”
You could also try: Malta
An alternative search term might be useful for users of several front ends. In this instance, you might consider using query expansion (see Using Query Expansion to Widen Searches) to add it as a local synonym.
Search terms and related queries can be words or phrases.
Working with Related Queries
To work with related queries, use the Related Queries tab on the Search > Search Features > Front Ends page in the Admin Console. For any front end, you can:
Add related queries individually
For complete information about using the Related Queries tab, click Admin Console Help > Search > Search Features > Front Ends in the Admin Console.
Identifying Related Queries
To identify potential related queries, get a list of the query terms that do not return results by creating a report of unsuccessful search queries. For information about this task, refer to Analyzing Searches that Do Not Return Results.
Changing the Appearance of Related Queries
|
•
|
Label text (You could also try)
|
For example, you might make the following changes:
|
•
|
The following figure illustrates these changes.
Search again using this term?: Malta
To make changes to the appearance of related queries, edit the Result Page Component section of the XSLT stylesheet. For information about editing the XSLT stylesheet, refer to Customizing the User Interface in the XSLT Stylesheet.
Using Dynamic Result Clusters to Narrow Searches
![]() Sometimes, users search with terms that return an overly broad set of results. You can help end users narrow searches by enabling dynamic result clusters. Dynamic result clusters show different topics for a specific search term. These topics enable users to focus on areas of interest while ignoring irrelevant information.
Sometimes, users search with terms that return an overly broad set of results. You can help end users narrow searches by enabling dynamic result clusters. Dynamic result clusters show different topics for a specific search term. These topics enable users to focus on areas of interest while ignoring irrelevant information.
membership options
membership help
membership pricing
membership privileges
membership specials
By default, dynamic result clusters are disabled. For any front end, you can:
|
•
|
Specify the placement of dynamic result clusters at the top or to the right of search results. If you have implemented KeyMatches (see Using KeyMatches to Guide Users to URLs) or OneBox modules (see Using OneBox Modules to Integrate Structured Results), you might want to place the dynamic result clusters to the right of search results. This minimizes user scrolling down the page for natural search results.
|
Enabling or Disabling Dynamic Result Clusters
The Google Search Appliance supports two methods of enabling and disabling dynamic result clusters:
Using the Page Layout Helper
To enable or disable dynamic result clusters using the Page Layout Helper:
|
1.
|
Choose Search > Search Features > Front Ends.
|
|
2.
|
|
3.
|
|
4.
|
To enable dynamic result clusters, click Dynamic result clusters. A checkmark appears.
|
|
5.
|
|
6.
|
Click Save.
|
Using the XSLT Stylesheet Editor
To enable dynamic result clusters in an XSLT stylesheet:
|
1.
|
Choose Search > Search Features > Front Ends.
|
|
2.
|
<!-- *** dynamic result cluster options *** -->
<xsl:variable name="show_res_clusters">0</xsl:variable>
<xsl:variable name="res_cluster_position">right</xsl:variable>
|
6.
|
Click Save.
|
Using Dynamic Navigation to Help Users Explore Results
![]() In many cases, content already has considerable metadata associated with it. As a search appliance administrator, you can use metadata to help users refine their search results by using Dynamic Navigation. When a user clicks on an attribute value, the search results are filtered to contain results from the original search query that also have that specific attribute value. The options are refreshed with the attribute values that are applicable to the new result set. Users can select multiple attributes and can easily back out of their selections to navigate the result set and quickly locate the results they are looking for.
In many cases, content already has considerable metadata associated with it. As a search appliance administrator, you can use metadata to help users refine their search results by using Dynamic Navigation. When a user clicks on an attribute value, the search results are filtered to contain results from the original search query that also have that specific attribute value. The options are refreshed with the attribute values that are applicable to the new result set. Users can select multiple attributes and can easily back out of their selections to navigate the result set and quickly locate the results they are looking for.
With dynamic navigation, you can use the following types of attributes:
|
•
|
Attributes based on META tags found in the HTML of the documents in the search index
|
For example, suppose multiple HTML documents in mediacompany.com's corpus include the following metadata value pairs:
<META NAME="author" CONTENT="Nikhil Jain">
<META NAME="author" CONTENT="Radha Chandika">
<META NAME="author" CONTENT="Rajat Mukherjee">
By using the Search > Search Features > Dynamic Navigation page, you can add the author attribute so that it appears as a “Author” option on the search results page. All the values associated with the author attribute appear under the option, as shown in the following figure.
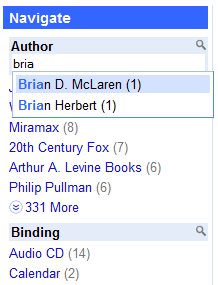
Dynamic navigation displays the counts for all matching results, as well as the number of values not displayed for an attribute, with a More link. Dynamic Navigation also provides search with auto-completion for attributes that have more values to display. This is indicated by a search icon (small magnifying glass) in the attribute name bar. To activate search with auto-completion, the user clicks the attribute name bar. As the user types in the search box, she can select any value in the auto-completion drop-down menu to filter the results.
You can use dynamic navigation by performing the following tasks:
A configuration defines the metadata attributes that are used to generate dynamic navigation options. By using the Search > Search Features > Dynamic Navigation page, you can create different configurations and apply the configurations to different front ends.
Also, for any configuration, you can enable dynamic navigation for secure search. With secure search, dynamic navigation only includes documents that the user is authorized to see. For more information, see Dynamic Navigation for Secure Search. You can also configure the search appliance to automatically expand configured dynamic navigation attributes to include other terms. For more information, see Configuring Query Expansion for Dynamic Navigation.
Dynamic Navigation for Secure Search
For information about how to enable dynamic navigation for secure search, see Creating a Configuration and Adding Attributes.
Fast Authorization Mode
Google recommends using fast authorization mode, which is the default mode.
All Authorization Mode
Google recommends using all authorization mode only under the following conditions:
Enabling Dynamic Navigation
Dynamic navigation is disabled by default. To enable dynamic navigation:
|
1.
|
Choose Search > Search Features > Dynamic Navigation.
|
|
2.
|
Click Enable.
|
To disable dynamic navigation, click Disable.
Creating a Configuration and Adding Attributes
By using the Search > Search Features > Dynamic Navigation page, you can configure different attributes in different configurations and apply the configurations to different front ends. Because an attribute that you add by using this page must exactly match the metadata NAME, ensure that you have the correct name from the metadata attribute before adding the dynamic navigation attribute.
To add a new configuration and attribute:
|
1.
|
Click Search > Search Features > Dynamic Navigation.
|
|
2.
|
|
3.
|
In the Name box, type a name for the new configuration.
|
|
4.
|
|
5.
|
In the Display Label box, type the label for the attribute.
|
|
6.
|
In the Attribute Name box, type the name of the attribute.
|
|
7.
|
Select the attribute type from the Type pull-down menu.
|
|
8.
|
If the type is INTEGER, FLOAT, CURRENCY, or DATE, click Range Attribute, if appropriate.
|
|
9.
|
If the type is STRING, click Case-Insensitive Attribute, if appropriate.
If the attribute is a Range Attribute, then provide the range values. No sorting options are available for range attributes. The values appear in the order entered. |
|
10.
|
Click OK.
|
|
12.
|
Under Front Ends, apply the configuration to one or more front ends by selecting a front end names from the Available Front Ends box. Selecting them moves them to the Added Front Ends box. To remove the added front ends, select them in the Added Front Ends box and they will move back to the Available Front Ends box. The front ends added to one configuration are not available in other configurations.
|
|
13.
|
Optionally, to use secure dynamic navigation, click Enable dynamic navigation for secure search under More Options and select one of the following authorization modes:
|
|
14.
|
After this step, the search appliance starts computing the dynamic navigation results for the selected front ends but does not yet show the results on the search pages. However, you can see the dynamic navigation results in the search XML output. To display the dynamic navigation results on the search page, follow the procedure in Showing Dynamic Navigation in a Front End.
For complete information about dynamic navigation configurations, click Admin Console Help > Search > Search Features > Dynamic Navigation in the Admin Console.
Showing Dynamic Navigation in a Front End
To show dynamic navigation in a front end:
|
1.
|
|
2.
|
|
3.
|
Click Show Dynamic Navigation.
|
|
4.
|
Click Save.
|
Configuring Query Expansion for Dynamic Navigation
The search appliance enables you to configure query expansion (see Using Query Expansion to Widen Searches) for configured dynamic navigation attributes.
To configure query expansion for dynamic navigation:
|
1.
|
Click Search > Search Features > Query Settings.
|
|
2.
|
|
3.
|
|
5.
|
Click Apply Settings.
|
|
6.
|
Click Search > Search Features > Front Ends.
|
|
7.
|
Click the Edit link next to the front end for which dynamic navigation has been applied and which needs attributes names synonyms.
|
|
8.
|
Select the Filters tab.
|
|
9.
|
|
10.
|
Click Save.
|
Providing Expert Search for Users
To use expert search, perform the following tasks:
Configuring Data Sources for Expert Search
For complete information about configuring data sources for expert search, click Admin Console Help > Search > Search Features > Expert Search in the Admin Console.
Enabling and Configuring Expert Search
To enable and configure expert search for a front end, use the Configure User Interface tab on the Search > Search Features > Expert Search page. This tab lists all the front ends that have been created for the search appliance.
To enable and configure expert search:
|
1.
|
Click Search > Search Features > Expert Search.
|
|
2.
|
On the Configure User Interface tab, click Configure on the line corresponding to the front end where you want to set up expert search.
|
|
3.
|
For complete information about enabling and configuring expert search, click Admin Console Help > Search > Search Features > Expert Search in the Admin Console.
Using People Search 
In the current search appliance release, people search is deprecated.
People search profiles can include:
Before configuring people search, populate the search index with content and metadata for people search. By using metadata attributes and the Search > Search Features > Expert Search page, you can configure the attribute profile information that you want to appear in search results.
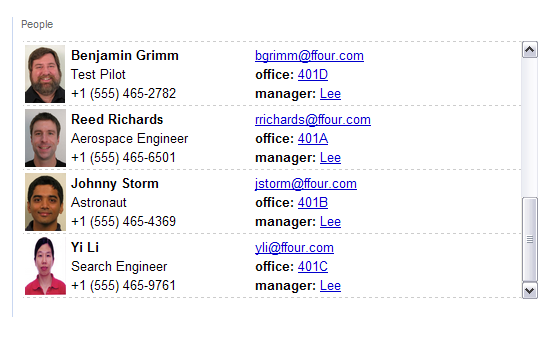
For example, suppose your people database includes the following metadata attribute value pairs:
<meta name="cn" content="Benjamin Grimm"/>
<meta name="uid" content="bgrimm"/>
<meta name="title" content="Test Pilot"/>
<meta name="location" content="401D"/>
<meta name="telephoneNumber" content="+1 (555) 465-2782"/>
<meta name="manager" content="Lee"/>
By configuring people search using this metadata, you can enable the search appliance to return people search profiles, such as the one for Benjamin Grimm, shown in the preceding figure. For information about how to specify attribute names on the Search > Search Features > Expert Search page, click Admin Console Help > Search > Search Features > Expert Search in the Admin Console.
Before configuring people search, create a people search source collection. A people search source collection is a segment of the search index that contains profile information. The source collection must contain one document for each person. You can create a people search source collection by using the Index > Collections page in the Admin Console. For information about creating a collection, click Admin Console Help > Index > Collections.
Configuring People Search
|
1.
|
|
2.
|
Select a collection for people search from the Source Collection pull-down menu.
|
|
3.
|
|
5.
|
|
6.
|
To specify a URL for profile images, enter it in the Image Source URL box.
|
|
7.
|
To make the profile image a link, enter a URL in the Image Link URL box.
|
|
8.
|
To change the scale of the profile image, enter the number of pixels in the Image Height and Image Width boxes.
|
|
9.
|
|
a.
|
To specify a label for the display value, enter a text string in the Label box. To specify formatting of the label, enter HTML and/or XSL tags.
|
|
b.
|
To specify the content of a people search results row, enter one or more attribute substitution patterns in the Display Value box. To specify formatting of the attribute value, enter HTML and/or XSL tags.
|
|
c.
|
To make the display value a link, enter a URL in the Link URL box.
|
|
12.
|
Click Save.
|
For complete information about configuring people search, click Admin Console Help > Social Connect > People Search in the Admin Console.
Showing People Search Results in a Front End
After you configure people search, show the people search results sidebar element in a front end.
To show the people search sidebar element in a front end:
|
1.
|
|
2.
|
|
3.
|
|
4.
|
Click Save.
|
Experimenting with Host Crowding Options
You might notice that search results are sometimes indented, as shown in the following example.
To disable the Duplicate Directory filter and/or the Duplicate Snippet filter, use the filter query parameter. For information about this topic, refer to Filtering in the Search Protocol Reference.
Using Filters to Restrict Search Results
![]() As an administrator, you can create custom filters for a front end to ensure that the search appliance serves appropriate results to end users. Filters are especially useful when a search appliance has multiple front ends for multiple types of end users.
As an administrator, you can create custom filters for a front end to ensure that the search appliance serves appropriate results to end users. Filters are especially useful when a search appliance has multiple front ends for multiple types of end users.
Working with Filters
To work with filters, use the Filters tab on the Search > Search Features > Front Ends > Output Format page in the Admin Console. For complete information about using the Filters tab, click Admin Console Help > Search Features > Front Ends > Filters in the Admin Console.
Restricting Search Results by Domain Name
You can use a domain filter to restrict results by domain name.
The domain name for Australia is www.mediacompany.com.au. You might use this domain name to create a domain filter so that when end users in Australia perform a search, only results that match the domain name appear. All domains ending with the name are filtered. For example, the domain mediacompany.com.au returns search results in all of the following domains:
|
•
|
www.mediacompany.com.au
|
|
•
|
news.mediacompany.com.au
|
|
•
|
ops.mediacompany.com.au
|
However, if the domain name is followed by a directory name, the domain name must be fully qualified when you enter it on the Filters tab. For example, mediacompany.com.au/marketing does not return any results under the domain name filter alone. The correct filter is www.mediacompany.com.au/marketing. If the directory marketing is in multiple domains, each filter must be specified individually on the Filters tab—one per line, one for each domain, as shown in the following example:
Restricting Search Results by Language
You can use a language filter to restrict results by language.
When the search appliance receives a language-restricted search request for which there are no results in the languages specified by a filter, it displays search results in all languages. If search users in Switzerland perform searches for which there are no results in German, French, or Italian, the users see results in other languages that are represented in the indexed content.
You can also create a filter with the Filters tab to display results for pages in any language.
Restricting Search Results by File Type
The search appliance can crawl many file types. You can use a file type filter to restrict results by file type. For a list of file types that the search appliance can crawl, click Admin Console Help > More Information > Crawling and Indexing in the Admin Console.
Suppose you have created a front end for mediacompany.com's sales staff. The only documents that interest the sales staff are in Portable Document Format (.pdf) or Microsoft PowerPoint (.ppt) format. You can create a file type filter that serves only these file types in the sales staff front end. When members of the sales staff perform a search, only results of the selected file types appear.
Restricting Search Results by Meta Tag
You can use meta tag filters to restrict results by meta tags and meta tag values.
The site www.mediacompany.com sells DVDs worldwide. Most DVDs are encoded by region. For example, DVDs encoded for region 1 (Canada, the United States, Bermuda, the Cayman Islands, and U.S. territories) play only on region 1 players.
<META NAME="region" CONTENT="region_1">
Value Type Input Parameters
You can also filter results by the values of the results' meta tags using the requiredfields and partialfields input parameters in a search query. For information about these input parameters, refer to the Search Protocol Reference.
If you set meta tag filters in the front end (using the Meta Tag Filter area), the search appliance appends these settings to the search query as requiredfields and partialfields input parameters. If you set meta tag filters in both the front end and in requiredfields and partialfields input parameters, the front end settings overwrite any input parameters that you have added to the search query.
Selecting a Query Expansion Policy for Meta Tags
Use a query expansion policy for meta tags to select the parts of the name/value pair in a meta tag that the search appliance expands with synonyms. The data used in this expansion comes from the query expansion files listed under Synonyms Data on the Search > Search Features > Query Settings page. Each file can be enabled and disabled independently for normal query expansion, meta name expansion and meta value expansion. Google recommends using a separate file for meta tag expansion. Using the normal language file may result in unintended expansions, such as stemming words.
If you have dynamic navigation enabled on this front end, enabling query expansion for meta tag also affects dynamic navigation. For more details, click Admin Console Help > Search > Search Features > Dynamic Navigation.
To set the query expansion policy for meta tags, use the Filters tab of the Search > Search Features > Front Ends page in the Admin console. For complete information about using the Filters tab, click Admin Console Help > Search > Search Features > Front Ends > Filters in the Admin Console.
To set the query expansion policy for meta tags for a front end:
|
1.
|
Click Search > Search Features > Front Ends > Filters.
|
|
2.
|
In the Query Expansion Policy for Meta Tags text box, select one of the following values:
|
|
3.
|
Click Save.
|
To disable the query expansion policy for meta tags for a front end:
|
1.
|
|
2.
|
Click Save.
|
Removing URLs from Search Results
![]() Occasionally, a search index contains URLs that the search appliance should not serve. For any front end, you can prevent the search appliance from serving URLs that match specific patterns.
Occasionally, a search index contains URLs that the search appliance should not serve. For any front end, you can prevent the search appliance from serving URLs that match specific patterns.
For example, suppose you do not want the search appliance to serve results about out-of-print DVDs in the customer front end. All documents that pertain to out-of-print DVDs are located in www.mediacompany.com/obsolete/. To prevent results from this URL being served, enter the URL pattern in the box on the Remove URLs tab. The URL patterns you provide must conform to the rules for valid URL patterns (see Constructing URL Patterns in Administering Crawl).
For complete information about using the Remove URLs tab, click Admin Console Help > Search > Search Features > Front Ends > Remove URLs in the Admin Console.
The remove URLs feature affects results only. It does not remove URLs from the index. To remove URLs from the index, enter them in the Do Not Follow Patterns section on the Content Sources > Web Crawl > Start and Block URLs page in the Admin Console. For more information about removing URLs from the index, refer to Administering Crawl.
Using Query Expansion to Widen Searches
![]() The Google Search Appliance can automatically expand search terms to include other terms. This expansion is based on synonyms, or alternative terms for the original search term, as well as inflection variants, and related terms. The search appliance includes the following types of query expansion files:
The Google Search Appliance can automatically expand search terms to include other terms. This expansion is based on synonyms, or alternative terms for the original search term, as well as inflection variants, and related terms. The search appliance includes the following types of query expansion files:
Additionally, you can add your own customized local query expansion files to a search appliance.
You can add your own set of meaningful terms to be added as synonyms. When query expansion is enabled, all synonyms on a search appliance apply to all front ends. To add terms for a specific front end, consider adding related queries instead (see Using Related Queries to Suggest Alternative Searches).
There are two steps to adding synonyms to query expansion:
Working with Query Expansion Files
To manage query expansion files, use the Search > Search Features > Query Settings page in the Admin Console. For complete information about using the Query Settings page, click Admin Console Help > Search > Search Features > Query Settings in the Admin Console.
Using Preconfigured Local Query Expansion Files
By default, query expansion terms are available in several languages. The Google Search Appliance's default language bundle contains these languages. You can change the supported languages by installing and activating a different language bundle (see Changing Languages for Query Expansion and Spelling Suggestions).
These files appear by default in the list of query expansion files on the Search > Search Features > Query Settings page in the Admin Console. Each file contains a set of common words that can supplement standard terms. By default, Google_English_stems is enabled.
You can use a preconfigured local file as it is. Alternatively, you can:
To perform any of these tasks, go to the Search > Search Features > Query Settings page.
You cannot delete preconfigured local files.
Using Customized Local Query Expansion Files
Follow these steps to create a local synonyms file:
|
•
|
From the File menu, choose Save As.
|
Entry format 1: term1 operator term2
|
•
|
term1 consists of one word or multiple words that are separated by single spaces.
|
|
•
|
term2 consists of one word or multiple words that are separated by single spaces. operator is one of the following:
|
|
•
|
= Specifies that the expansion is bi-directional. The appliance expands a search query for term1 or term2 by adding the other term.
|
|
•
|
> Causes the appliance to add term2 when a search query contains term1. To expand term1 into multiple terms, you specify multiple entries separated by commas: term1 > term2, term1 > term3.
|
ebu = education business unit
tbu = telecomm business unit
telecom business unit = telecomm business unit
partner > indirect sales
widgets > parts, widgets > items
A query where the search term is ebu is expanded to include additional documents that contain the phrase educational business unit. A query where the search term in educational business unit is expanded to include additional documents that contain the term ebu. Notice that the two queries, ebu and educational business unit, are not equivalent. Also, a query where the search term is a phrase (enclosed by quotation marks), such as "educational business unit," is not expanded.
Entry format 2: {term, term, ...}
{run, runs, running, ran}
{widgets, parts, items}
{safe}
For information about uploading a synonyms file, click Admin Console Help > Search > Search Features > Query Settings in the Admin Console.
Using Blacklists
For example, suppose mediacompany.com starts a new project with the code name “glue.” You could add “glue” to the blacklist to ensure that user queries do not expand to include “adhesive.”
Follow these steps to create a blacklist file:
This is an example of a blacklist file:
#Blacklist file created July 2006
#Author: lana
glue
component
This file prevents queries for “glue” and “component” from being enhanced with synonyms.
For information about uploading a blacklist file, click Admin Console Help > Search > Search Features > Query Settings in the Admin Console.
Using Stopwords
A stopwords file is a text file of three megabytes or less, containing a case-insensitive list of one or more alphanumeric stopwords. By default, the search appliance has 26 files of stopwords for supported languages. For a list of the default stopwords files, see the files listed under Stopwords Data on the Search > Search Features > Query Settings page. Of these files, two are enabled by default: Google_Default_Stopwords and Google_English_Stopwords. Additionally, you can create and upload your own stopwords files.
The following example shows an excerpt from the contents of the Google_Default_stopwords.txt file. Each of the following words is ignored in a search query.
the
of
to
in
for
is
on
that
by
with
this
be
it
www
are
...
For information about uploading a stopwords file, click Admin Console Help > Search > Search Features > Query Settings in the Admin Console.
Searches can be restricted to a particular language in either of the following ways:
|
•
|
Creating a language filter in a front end by using the Filters tab of the Search > Search Features > Front Ends page
|
|
•
|
Adding the lr=lang_<xyz> (language restrict) query parameter to the search request
|
For information about creating a language filter in a front end, see Restricting Search Results by Language. For information about language restrict query parameter, see the Search Protocol Reference.
Files with Macintosh style end-of-line characters
Setting the Query Expansion Policy for a Front End
The following table describes the query expansion policies that you can set for a front end.
Query expansion files are used only if the query expansion policy for a front end is set to Local or Full on the Search > Search Features > Front Ends > Filters tab.
To set the query expansion policy for a front end, use the Filters tab of the Search > Search Features > Front Ends page in the Admin console. For complete information about using the Filters tab, click Admin Console Help > Search > Search Features > Front Ends > Filters in the Admin Console.
Enabling Translation of Search Results
When the user clicks a translation link, the search appliance sends the content, client-id, and user language to Google Translate using a secure connection. For more information about the Website Translator plugin, visit the Google Translate Help Center. Google recommends that Internet Explorer customers use translate from the HTTPS search results page.
You can enable or disable translation for any front end. To enable translation, use the Search > Search Features > Front Ends > Output Format page in the Admin Console. For complete information about using this page, click Admin Console Help > Search > Search Features > Front Ends > Output Format - Page Layout Helper in the Admin Console.
Changing Languages for Query Expansion and Spelling Suggestions
![]() A language bundle is a collection of resource files that the Google Search Appliance uses for query expansion and spelling in several languages. The following table lists the language bundles that Google provides.
A language bundle is a collection of resource files that the Google Search Appliance uses for query expansion and spelling in several languages. The following table lists the language bundles that Google provides.
|
||||||||||||||||||||||||||||||||||||||||
|
http://dl.google.com/dl/enterprise/all_langs-lang-pack-2.2-1.bin |
|||||||||||||||||||||||||||||||||||||||
|
||||||||||||||||||||||||||||||||||||||||
|
||||||||||||||||||||||||||||||||||||||||
|
||||||||||||||||||||||||||||||||||||||||
|
http://dl.google.com/enterprise/egfisdfp-lang-pack-2.1-1.bin |
|||||||||||||||||||||||||||||||||||||||
|
http://dl.google.com/dl/enterprise/mea_north_eastern-lang-pack-2.1-1.bin |
You can enable search appliance support for a language bundle by performing the following tasks:
To install and activate a language bundle, use the Search > Search Features > Language Bundles page in the Admin Console. For information about using this page, click Admin Console Help > Search > Search Features > Language Bundles in the Admin Console.
Enabling/Disabling Click-Jacking Defense
When the click-jacking defense is enabled the search appliance sends an X-Frame-Options: SAMEORIGIN header to prevent the iframe of search results pages.
Also, when click-jacking defense is enabled:
|
•
|
By default, click-jacking defense is enabled.
To enable/disable click-jacking defense:
|
1.
|
Click Search > Search Features > Query Settings.
|
|
2.
|
|
3.
|
Click Save.
|
Using OneBox Modules to Integrate Structured Results
![]() In some instances, the most relevant result for a search query is real-time, structured data. This type of data does not usually reside in the search index because it would be obsolete before it could be indexed.
In some instances, the most relevant result for a search query is real-time, structured data. This type of data does not usually reside in the search index because it would be obsolete before it could be indexed.
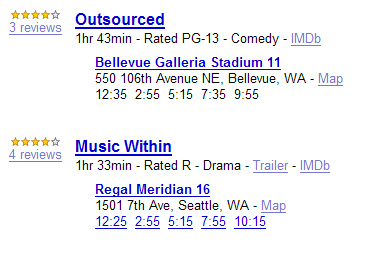
For example, as a service to its users, mediacompany.com provides information about local movie times. When a user searches for “movies,” a specially formatted search box appears at the top of the search results, as illustrated in the following figure.
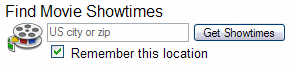
The search appliance supports two types of OneBox modules:
For detailed information about developing OneBox modules, refer to the following documents:
Using Result Biasing to Influence Result Ranking
![]() The Google Search Appliance ranks the documents that it finds in response to a user search query. For each document, the search appliance calculates a score that:
The Google Search Appliance ranks the documents that it finds in response to a user search query. For each document, the search appliance calculates a score that:
|
•
|
|
•
|
|
•
|
|
•
|
Working with Result Biasing
|
1.
|
Create a result biasing policy using the Search > Search Features > Result Biasing page in the Admin Console.
|
|
2.
|
Configure source biasing, date biasing, or metadata and entity biasing for the policy using the Search > Search Features > Result Biasing > edit page in the Admin Console. A menu-driven interface allows weak or strong increases or decreases, and requires no complex coding or scripting. You can use 11 settings to adjust result biasing from least influence to most influence.
|
|
3.
|
Enable the result biasing policy by selecting it for use with a front end using the Search > Search Features > Front Ends > Filters page in the Admin Console.
|
For complete information about using the Search > Search Features > Result Biasing page, the Search > Search Features > Result Biasing > edit page and the Search > Search Features > Front Ends > Filters page, refer to the Admin Console Help in the Admin Console.
Using Source Biasing
|
Specifies how much influence source biasing has in calculating scores for results rankings overall. The default influence is No influence. You can change this to one of ten settings in a range of More influence for a search appliance. |
|
|
Specifies how much influence source biasing has in calculating scores for documents that match specific URL patterns. The default strength is Leave unchanged. You can change this to Strong, Medium, or Weak increase or Strong, Medium, or Weak decrease for each collection or specified URL pattern. |
|
•
|
Microsoft Word documents are stored on www.mediacompany.com/drafts
|
|
•
|
PDF documents are stored on www.mediacompany.com/publications
|
|
•
|
Boost www.mediacompany.com/publications by setting a strong increase
|
|
•
|
Weaken www.mediacompany.com/drafts by setting a weak decrease
|
Using Date Biasing
Using date biasing, you can specify the influence date biasing has in increasing the scores of more recent documents relative to older documents. The default influence is No influence. You can change this to one of ten settings in a range of More influence for a search appliance.
For example, suppose the mediacompany.com search index contains all DVD reviews written during the past ten years. Typically, end users are interested in only searching the most recent reviews. However, staff is interested in searching for all reviews.
Which Document Dates Are Used for Date Biasing?
The document date that the Google Search Appliance evaluates for date biasing is specified on the Index > Document Dates page. For example, the search appliance can use one of the following dates:
Using Metadata and Entity Biasing
|
Specifies how much influence metadata and entity biasing has in calculating scores for results rankings overall. The default influence is No influence. You can change this to one of ten settings in a range of More influence for a search appliance. |
|
|
Specifies how much influence metadata and entity biasing has in calculating scores for documents that match specific META tag NAME-CONTENT value pairs. The default strength is Leave unchanged. You can change this to Strong, Medium, or Weak increase or Strong, Medium, or Weak decrease for each specified URL pattern. |
<META NAME="author" CONTENT="human_resources">
Providing Alerts for End Users
![]() Some users might want to monitor topics of interest by receiving search results for these topics in email messages. You can allow users to monitor topics this way by enabling alerts. Alerts are email updates of the latest relevant search results based on a user's topic of interest.
Some users might want to monitor topics of interest by receiving search results for these topics in email messages. You can allow users to monitor topics this way by enabling alerts. Alerts are email updates of the latest relevant search results based on a user's topic of interest.
A user sets up an alert by clicking My Alerts on the search page (shown in the following figure) and then logging in to the search appliance.
On the Manage your Alerts page, the user can create an alert by identifying search terms that will return relevant results and a frequency of searches. After the user creates an alert, the search appliance sends the user an email whenever it finds new or changed documents about the topic of interest. The following figure shows the Manage your Alerts page.
To provide alerts for users, you must:
|
2.
|
Specify rules for document dates by using the Index > Document Dates page or ensure that the rules are working.
|
|
4.
|
Alert emails use the sender of outgoing emails that is specified in the Email Notification area on the Administration > System Settings page during search appliance installation. If the sender of outgoing emails is not specified during installation, the default value of nobody@localhost is used. For information about specifying the value of sender of outgoing emails, refer to Configuring the Network Settings in Installing the Google Search Appliance.
Enabling Alerts
If alerts are not currently enabled for a search appliance, you can enable them using the Index > Alerts page in the Admin Console (see Providing Alerts for End Users). If alerts are enabled, you can disable them.
To enable alerts for a search appliance:
|
1.
|
Choose Index > Alerts.
|
|
2.
|
Click Enable.
|
To disable alerts for a search appliance:
|
1.
|
Choose Index > Alerts.
|
|
2.
|
Click Disable.
|
Showing the My Alerts Link
The Google Search Appliance supports two methods of showing the My Alerts link on a search page:
You cannot use the Page Layout Helper to show the My Alerts link if you have customized the XSLT stylesheet. If you have done this, you must show the My Alerts link directly in the XSLT stylesheet.
Using the Page Layout Helper
To show the My Alerts link using the Page Layout Helper:
|
1.
|
Choose Search > Search Features > Front Ends.
|
|
2.
|
|
3.
|
|
4.
|
|
5.
|
Click Save.
|
Using the XSLT Stylesheet Editor
This section describes showing the My Alerts link using the XSLT Stylesheet Editor. If you prefer, you can edit the XSLT stylesheet in another editor.
To show the My Alerts link in an XSLT stylesheet:
|
1.
|
Choose Search > Search Features > Front Ends.
|
|
2.
|
<!-- *** alerts2 options *** -->
<xsl:variable name="show_alerts2">0</xsl:variable>
|
4.
|
Show or hide the My Alerts link:
|
|
5.
|
Click Save.
|
Providing User Results

To provide user results capability, add one or more user results configurations. Google recommends enabling query suggestions (see Providing Query Suggestions) with user results so that they can appear as query suggestions.
Adding a User Results Configuration
To add a user results configuration, use the Search > Search Features > User Results page.
For each configuration, you can specify:
For complete information about adding a user results configuration, refer to the Admin Console Help > Search > Search Features > User Results page in the Admin Console.
Moderating User Results
By using the Search > Search Features > User Results page, you can moderate new or existing user results. When there is one or more new user results to validate, a Validate link on the page is highlighted in red and shows the number of results awaiting validation.
You can moderate either all user results at once or one or more individual results.
Enabling Authentication for User Results
To enable authentication for user results:
|
1.
|
Choose Search > Secure Search > Access Control.
|
|
2.
|
Click the check box for Require authentication for User Results.
|
|
3.
|
Click Save.
|
To disable authentication for user results:
|
1.
|
Choose Search > Secure Search > Access Control.
|
|
2.
|
Clear the check box for Require authentication for User Results.
|
|
3.
|
Click Save.
|
How Users Can Add Results
To add a result, a user performs the following steps:
|
6.
|
If you are moderating user results, a confirmation box appears telling the user that the new result requires your approval. To submit the result, click OK. After you approve the result, it begins to appear for the appropriate keyword searches.
Providing Query Suggestions
![]() You can help users improve searches by enabling query suggestions for a new or existing front end. When query suggestions are enabled, search queries auto-complete and query suggestions appear as a user types in the search box.
You can help users improve searches by enabling query suggestions for a new or existing front end. When query suggestions are enabled, search queries auto-complete and query suggestions appear as a user types in the search box.
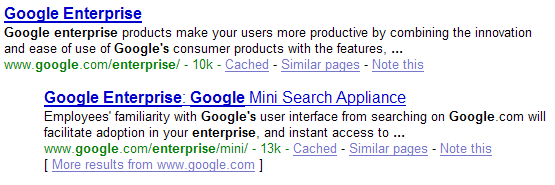
For example, suppose a user starts typing “Google Search Appliance” in the search box. Query suggestions causes the term to auto-complete before the user finishes typing it. Alternative terms that narrow the search also appear in a menu below the search box. For example, for this search, terms that appear might include “Google Search Appliance training,” “Google Search Appliance documentation,” “Google Search Appliance Forum,” and other similar terms. Query suggestions can include user results (see Providing User Results), which are displayed in italic font style. The user can execute a search by selecting one of the terms.
|
1.
|
Choose Search > Search Features > Front Ends.
|
|
2.
|
Create a new front end or select an existing front end from the Current Front Ends list and click Edit.
|
|
3.
|
|
4.
|
Check the Enable auto- completion in search box check box.
|
|
5.
|
Click Save.
|
|
1.
|
Uncheck the Enable auto-completion in search box check box.
|
|
2.
|
Click Save.
|
|
3.
|
Recheck the Enable auto-completion in search box check box.
|
|
4.
|
Click Save.
|
Exporting Query Suggestions
|
1.
|
Click Search > Search Features > Suggestions.
|
|
5.
|
Click Export.
|
Exporting and Importing the Suggestions Blacklist
The search appliance also has a suggestions blacklist, which contains words that are excluded from query suggestions. If you want to change the blacklist, you can use the options on the Search > Search Features > Suggestions page to perform the following tasks:
You can export the search appliance's suggestions blacklist by using the options under Export Suggestions Blacklist. To export a suggestions blacklist
|
1.
|
Click Export.
|
You can import a suggestions blacklist by using the options under Import Suggestions Blacklist. To import a suggestions blacklist:
|
1.
|
Enter the filename of a suggestions blacklist file or click Choose File and navigate to the correct file.
|
|
2.
|
Click Import.
|
A partial match is used for entries in the suggestions blacklist. For example, an entry for ray in the blacklist blocks ray and raymond. To block only ray, use regular expression ^ray$.
Providing Document Previews
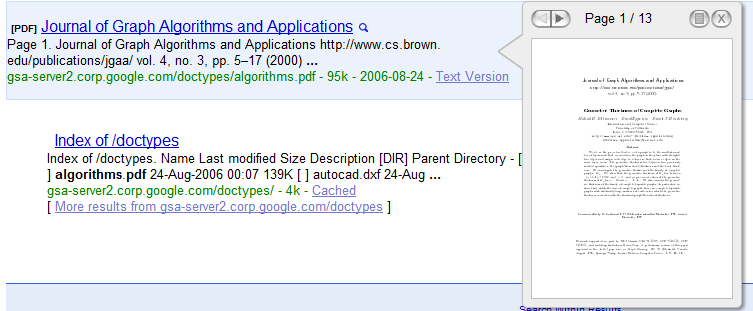
The search appliance supports document previews for the following formats:
However, document previews are not available for .doc, .pdf and .ppt files in zip files.
To provide document previews to your users, perform the following tasks:
|
1.
|
Enabling the document preview module by using the Search > Search Features > Document Preview Module page.
|
|
2.
|
Showing document previews in a front end by using the Page Layout Helper on the Output Format tab of the Search > Search Features > Front Ends page.
|
For complete information about providing document previews, click Admin Console Help > Search > Search Features > Document Preview Module in the Admin Console.
For information about document preview limitations, see Specifications and Usage Limits.
Enabling Wildcard Search
The search appliance is able to consider all words with * as wildcard terms, so users don't need to prepend the wildcard: special operator to a pattern that contains this operator. To enable the search appliance to do this, click the Consider words with * as wildcards by default checkbox on the Search > Search.
|
1.
|
In the Admin Console, click Search > Search Features > Front Ends > Filters.
|
|
2.
|
In the Maximum expansion per wildcard term text box enter a value from 0 (disable wildcard search) to 1000.
|
|
3.
|
Optionally, click the Consider words with * as wildcards by default checkbox
|
|
4.
|
Click Save.
|
For complete information about enabling wildcard search, click Admin Console Help > Search > Search Features > Front Ends > Filters in the Admin Console.
Tuning Search Results
Optimizing the Speed of Results
Analyzing Searches that Do Not Return Results
Sometimes, user search queries fail to return available information. In these instances, you can use front end configuration features such as KeyMatch (see Using KeyMatches to Guide Users to URLs), related queries (see Using Related Queries to Suggest Alternative Searches), and query expansion (see Using Query Expansion to Widen Searches) to provide better results.
To identify search terms that do not return results, generate a search report, as described in Generating a Report of Unsuccessful Search Queries. The report on searches that do not return results contains lists of top keywords and top queries that do not return results. The following example shows Top Keywords and Top Queries in a search report.
You could also try: 401K Pre-Tax Plans

Generating a Report of Unsuccessful Search Queries
When you generate a report of unsuccessful search queries, you specify the following information:
For example, you might create a report of unsuccessful search queries called Operations Zero Results Report on the default_collection for the previous week.
To create a report of unsuccessful search queries:
|
1.
|
Choose Reports > Search Reports.
|
|
2.
|
From the Show Search Reports for Collection drop-down menu, select the collection whose search queries you want to include.
|
|
3.
|
Under Define Search Report, type a name for the report.
|
|
4.
|
|
5.
|
Under Report timeframe, specify the period that you want the report to cover.
|
|
6.
|
|
7.
|
By default, the report shows the top 100 keywords and queries. At Number of top queries and keywords to show, change the number if you prefer more results or fewer results.
|
|
8.
|
Click Generate Report.
|
To view the report, click View under List of search reports.
Managing the Search Index
Keeping the Search Index Clean
You can help improve user searches by making sure that your index is as “clean” as possible. A clean index contains valuable documents and does not contain unnecessary documents. You can ensure a clean index when you set up the URLs for crawling your content on the Content Sources > Web Crawl > Start and Block URLs page in the Admin Console.
Generally, there are two methods for setting up URLs for crawling your content:
|
•
|
Using a whitelist of URLs. List all possible URLs at your company in the Start URLs section.
|
|
•
|
Using a blacklist of URLs. List unwanted URLs in the Do Not Follow Patterns section.
|
Using Both a Whitelist and a Blacklist of URLs
Using Only a Whitelist of URLs
Segmenting Data in the Search Index
![]() User searches can be more efficient when they are restricted to subsets of the entire search index. As an administrator, you can help users to search more efficiently by using collections. A collection is a segment of the complete search index that you define by specifying URL patterns to include.
User searches can be more efficient when they are restricted to subsets of the entire search index. As an administrator, you can help users to search more efficiently by using collections. A collection is a segment of the complete search index that you define by specifying URL patterns to include.

The search appliance allows you to create an unlimited number of collections for a search index. To create a collection, use the Index > Collections page in the Admin Console. For information about using this page to create a collection, see Admin Console Help > Index > Collections.
Searching Collections
&site=COLLECTION_NAME
The following examples show search queries for searching collections.
A search for “vacation” in the collection Human_Resources:
http://www.google.com/search? q=vacation&output=xml&client=yoursite&site=human_resources
This search returns vacation results specifically from URLs in the Human_Resources collection.
A search for “product” in the collections Development and Marketing:
http://www.google.com/search?q=product&output=xml&client=yoursite&site= (development)|(marketing)
This search for “product” returns results from either the Development or Marketing collections.
For more information, see the Filtering section of the Search Protocol Reference.
Enabling Users to Search Multiple Collections
http://search.corp.mycompany.com/search?q=query+string
&site=all_content
&client=default_frontend
&output=xml_no_dtd
&proxystylesheet=default_frontend
http://search.corp.mycompany.com/search?q=query+string
&site=sales|marketing
&client=default_frontend
&output=xml_no_dtd
&proxystylesheet=default_frontend
http://search.corp.mycompany.com/search?q=query+string
&site=engineering.support
&client=default_frontend
&output=xml_no_dtd
&proxystylesheet=default_frontend
For complete information about using search parameters, refer to the Search Protocol Reference.
Evaluating Search Performance
In addition to getting feedback from end users, you might want to exchange ideas with other search appliance administrators or members of the Google for Work team. For information on this topic, refer to Exchanging Information on Google Groups.
Adding a Feedback Mechanism for Users
Some easy ways you can enable users to give feedback might include:
Conducting a User Satisfaction Survey
Some tips for creating a user satisfaction survey are:
The following example questions might help you develop your own survey questions.
|
•
|
|
•
|
|
•
|
|
•
|
|
•
|
|
•
|
Exchanging Information on Google Groups
Google wants you to get all possible value from your Google Search Appliance. An effective way to do this is to join the Google Search Appliance Discussion Forum, http://groups.google.com/group/Google-Search-Appliance. This group is a discussion forum where you can post questions, feedback, or advice for other users. The group also provides access to a knowledge base and useful files for administering a Google Search Appliance.
Updating Your Search Appliance
|
•
|