


Crawl, Index, and Serve
Authentication, Authorization, and Controlled-Access Content
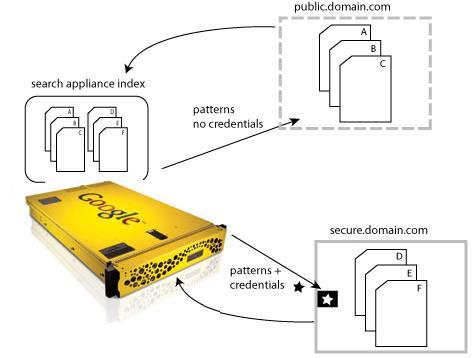
All controlled-access content that is available to the search appliance is indexed. For more details, see Crawl and Index for Controlled-Access Content. After the controlled-access content is indexed, the search appliance determines whether to display the content in response to each search request.
The Google Search Appliance provides centralized serve-time authentication with Universal Login (see Universal Login). With centralized serve-time authentication, a user who is searching for protected content is prompted for credentials once by the Universal Login Form for set of authentication mechanisms that share a username and password. For detailed information about Universal Login and authentication, see Authentication.
After the search appliance authenticates a user by establishing the user’s identity, the search appliance performs authorization checks to determine whether a user has access to the secure content that matches their search. For detailed information about authorization on the Google Search Appliance, see Authorization.
A Google Search Appliance provides additional methods for enabling authentication and authorization that do not require user impersonation. These are discussed in The SAML Authentication Service Provider Interface (SPI) and How to Exclude Controlled-Access Content Sources from Search.
This chapter provides information on how to configure the Google Search Appliance to crawl, index, and serve controlled-access content. For examples of configuring a search appliance, see Use Cases with Public and Secure Serve for Multiple Authentication Mechanisms.
Crawl and Index for Controlled-Access Content
How a Search Appliance Indexes Controlled-Access Content
Configuring Crawl for Cookie-Based Access
|
•
|
Define a rule under Content Sources > Web Crawl > Secure Crawl > Forms Authentication for controlled-access content sources that require the search appliance to obtain a session cookie from a login form. Content accessed through a forms authentication site can be secure or public during serve. For more information click Admin Console Help > Content Sources > Web Crawl > Secure Crawl > Forms Authentication in the Admin Console.
|
|
•
|
If the URL pattern that matches the forms authentication rule includes a logout page, the search appliance attempts to crawl the logout page, which essentially results in cookie expiration. If the SSO system includes a logout page, then exclude the logout page by adding it to Do Not Follow Patterns on the Content Sources > Web Crawl > Start and Block URLs page. For more information click Admin Console Help > Content Sources > Web Crawl > Start and Block URLs in the Admin Console.
|
Configuring Crawl for HTTP Basic or NTLM HTTP
|
•
|
The Crawl and Index process for content that uses HTTP Basic and NTLM HTTP is controlled by parameters under Content Sources > Web Crawl > Secure Crawl > Crawler Access. To learn more about setting up crawl for HTTP Basic and NTLM HTTP, click Admin Console Help > Content Sources > Web Crawl > Secure Crawl > Crawler Access in the Admin Console.
|
Configuring Crawl for HTTP Basic/NTLM and Cookies
To configure crawling for a site that is protected by Basic/NTLM and cookies:
|
1.
|
On the Content Sources > Web Crawl > Start and Block URLs page, add the URL for the protected site to the Start URLs and Follow Patterns.
|
|
2.
|
On the Content Sources > Web Crawl > Secure Crawl > Forms Authentication page, create a new forms authentication rule for the protected site:
|
|
a.
|
For the Sample Forms Authentication protected URL, enter the URL of a content page in the protected site.
|
|
b.
|
For the URL pattern for this rule, set it to the URL that you entered in the Follow Patterns or a more general pattern.
|
|
c.
|
Click Create.
Normally when setting up Forms Auth, the Admin Console will render a login page for you to enter crawl-time credentials. But because there's no form associated with the URL, the Admin Console displays an error page generated by the content provider instead. |
|
d.
|
Ignore the error page and click Save and Close.
The Forms Authentication page appears and your new rule is listed with its pattern, action, and form fields. |
|
e.
|
Click Save.
|
|
3.
|
On the Content Sources > Web Crawl > Secure Crawl > Crawler Access page, set up crawler access:
|
|
a.
|
Create a new rule for the URL that you entered in the Follow Patterns.
|
|
b.
|
Click Save.
|
Configuring Crawl for the SAML Authentication and Authorization Service Provider Interface
|
•
|
Make sure that you have defined some patterns for crawling your controlled-access content under Content Sources > Web Crawl > Start and Block URLs.
|
|
•
|
For content that requires HTTP Basic Authentication or NTLM HTTP credentials, set up the crawl under Content Sources > Web Crawl > Secure Crawl > Crawler Access and clear the Make Public checkbox for at least one URL pattern.
|
|
•
|
For content that requires a Forms Authentication rule to authenticate using a single sign-on (SSO) server, set up the crawl under Content Sources > Web Crawl > Secure Crawl > Forms Authentication and clear the Make Public checkbox for at least one URL pattern.
|
Configuring Crawl and Serve for Kerberos
The search appliance supports Integrated Windows Authentication/Kerberos authentication for both crawling and serving controlled-access content. Before you can configure Kerberos crawling, the search appliance must be configured to use Kerberos authentication at serve time. For information about configuring Kerberos-based authentication for serve, see Kerberos-Based Authentication.
After Kerberos-based authentication for serve is configured, you can enable Kerberos crawling by using the Content Sources > Web Crawl > Secure Crawl > Crawler Access page. For more information about enabling Kerberos crawling, click Admin Console Help > Content Sources > Web Crawl > Secure Crawl > Crawler Access in the Admin Console.
Providing Dynamic Serve-Time Security on a Per-URL Basis
The search appliance can accept a serve-time security setting for a document sent by a web server through the X-Gsa-Serve-Security HTTP header. This HTTP header can be useful for setting serve-time security for documents fed in by metadata-and-url feeds, as with Connectors V4.
The X-Gsa-Serve-Security HTTP header can only have one of the following values:
|
•
|
secure--To mark a document as protected, use X-Gsa-Serve-Security: secure
|
|
•
|
public--To mark the document as public, use X-Gsa-Serve-Security: public
|
The X-Gsa-Serve-Security HTTP header works along with other access-control mechanisms, including ACLs and x.509 certificates. For example, to ensure that a document is secure at serve time, you might provide:
|
•
|
x.509 certificate security at crawl time, but no X-Gsa-Serve-Security HTTP header
|
|
•
|
x.509 certificate security at crawl time and an X-Gsa-Serve-Security HTTP header with a value of secure
|
|
•
|
To ensure that a document is public at serve time, you might provide an HTTP header with a value of public with no ACLs or crawl-time security.
Configuring Crawl and Serve Over HTTPS
The search appliance uses digital certificates when communicating with web browsers and servers over HTTPS. The search appliance also supports the use of digital certificates to perform X.509 certificate authentication to verify a user’s identity before serving secure results, as described in Client Certificate-Based Authentication.
|
•
|
By using the options in the Default Certificate Authorities area of the Administration > Certificate Authorities page, you can disable or re-enable default certificate authorities. For information about using certificate authorities, click Admin Console Help > Administration > Certificate Authorities.
This section provides a general overview of how to install a digital certificate for use by the search appliance. For more detailed instructions, including an explanation of how to request a digital certificate from a certification authority and decrypt an encrypted private key, click Admin Console Help > Administration > SSL Settings in the Admin Console.
Note: The SSL Settings page can only install non-encrypted RSA keys in .pem (privacy enhanced mail) format. If the private key is encrypted or in PKCS#12 format (see http://en.wikipedia.org/wiki/PKCS12), refer to the instructions in the Admin Console Help.
To configure the search appliance to enable crawl and serve over HTTPS:
|
2.
|
|
3.
|
|
•
|
Under SSL Certificate, enter the file name of the certificate or click the Browse button to locate it. If you are using an intermediate certificate, enter the name of the file that includes both the intermediate certificate and the host certificate.
|
|
•
|
Under SSL Private Key, enter the file name of the unencrypted private key or click the Browse button to locate it. If the SSL Certificate contains an intermediate certificate, use the private key that corresponds to the host certificate.
|
|
4.
|
Click the View Certificate Information button.
|
|
5.
|
Installing the certificate will restart the Admin Console and the front end. If you are ready to install, click the Install SSL Certificate button.
When the page refreshes, the following message appears at the top: |
SSL certificate installed. The appliance console needs to be restarted, please log in again.
|
6.
|
|
7.
|
Choose Administration > SSL Settings. Your new certificate information is listed under Current SSL Certificate Information.
|
Secure Content and Public Content
It’s important to understand that when controlled-access content is labeled as “public” in the index, it is shown in all users’ search results. Because public search results are served from the index without checking for authorization, users can discover all public content that the search appliance has access to, regardless of whether they have authorization to view that content.
How a Search Appliance Labels Controlled-Access Content Sources as Public or Secure
When crawling and indexing controlled-access content over HTTP or HTTPS, the search appliance assigns public or secure status based on the type of crawl, and the Make Public checkbox in the Admin Console. If the Make Public checkbox is selected on the Content Sources > Web Crawl > Secure Crawl > Forms Authentication page, content is labeled as public. When the checkbox is cleared, content is labeled as secure.
Note that by selecting Make Public, all documents matching the URL pattern become public, even if ACLs are associated with the documents or the authmethod attribute in the feed record is set to a secure value.
The search appliance assigns status from these pages:
|
•
|
Web and content feeds: the authmethod attribute for the record specifies whether content is treated as public or secure.
|
|
•
|
To make feed content public, set the authmethod value to none. This is the default for content provided by feeds.
|
|
•
|
|
•
|
Connectors: If the connector supports authentication and authorization, and the Make Public checkbox is cleared, content from that connector is labeled as secure. In all other cases, content from a connector is labeled as public. To determine whether a connector instance supports authentication and authorization, look up Security Support in the Configuration guide for your connector.
|
How a Search Appliance Determines What to Display in Public Search Results
The front end configuration for a search results page controls how much information users see for each item in the search results. When you make controlled-access content available for public search, open the Page Layout Helper or the XSLT Stylesheet Editor for each front end and review the stylesheet configuration to ensure that you are not revealing more information than the user needs.
In the Page Layout Helper, these parameters under Search Results control which information is displayed:
|
•
|
When Snippet is selected, the <S> element is displayed in the search results. Clear the Snippet check box to remove snippets from the search results.
|
|
•
|
When Page Size is selected, the <C> element’s page size SZ value is displayed in the search results. Clear the Page Size check box to remove information about the document’s size from the search results.
|
|
•
|
When Modified Date is selected, the <CACHE_LAST_MODIFIED> element is included in the XML results. Clear the Modified Date check box to remove information about the document’s freshness from the search results.
|
|
•
|
When Cache Link is selected, the <C> element is included in the XML results. Clear the Cache Link check box to remove the link to the cached document from the search results.
|
|
•
|
The Result Page navigation at the bottom of the page can indicate how many results are available. To prevent users from using this information to deduce how large your index is, choose the third option, which excludes both the “Gooooogle” navigation and the numbered references to search results pages.
|
In the XSLT Stylesheet Editor, these XSL variables control which information is displayed:
|
•
|
show_res_snippet specifies whether to display a snippet for each result. Set <xsl:variable name="show_res_snippet">0</xsl:variable> to remove snippets from the search results.
|
|
•
|
show_meta_tags specifies whether to display metadata for each result. Set <xsl:variable name="show_meta_tags">0</xsl:variable> to remove the document’s metadata from the search results.
|
|
•
|
show_res_size specifies whether to display the page size for each result. Set <xsl:variable name="show_res_size">0</xsl:variable> to remove information about the document’s size from the search results.
|
|
•
|
show_res_date specifies whether to display the last-modified date for each result. Set <xsl:variable name="show_res_date">0</xsl:variable> to remove information about the document’s freshness from the search results.
|
|
•
|
show_res_cache specifies whether to display the cache link for each result. Set <xsl:variable name="show_res_cache">0</xsl:variable> to remove the link to the cached document from the search results.
|
|
•
|
choose_bottom_navigation specifies which navigation option to use at the bottom of the results page. Set <xsl:variable name="choose_bottom_navigation">simple</xsl:variable> to exclude both the "Gooooogle" navigation and the numbered references to search results pages.
|
Authentication
|
•
|
This section describes how a search appliance performs authentication, and how to configure authentication for the supported mechanisms. For information about how the search appliance determines whether an authenticated user, system, or service has access to secure content, see Authorization.
Universal Login
With Universal Login, a user who is searching for protected content is prompted for credentials once by the Universal Login Form for set of authentication mechanisms that share a username and password. The user is granted (or denied) access to the resources based on the credentials and the search appliance returns the appropriate search results. The Google Search Appliance supports Universal Login for the following authentication mechanisms:
|
•
|
Cookie-Based Authentication (single sign-on, forms)
|
|
•
|
HTTP-Based Authentication (HTTP Basic, NTLM)
|
|
•
|
The Google Search Appliance also supports authentication without Universal Login using LDAP (see Integrating the Search Appliance with an LDAP Server).
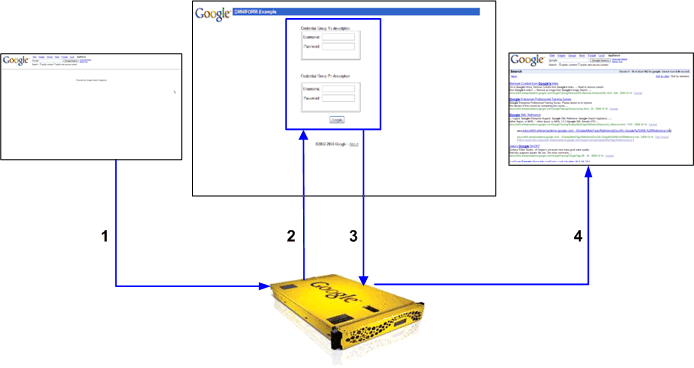
The numbers in the diagram refer to the following steps in the process:
|
2.
|
|
3.
|
The user enters one or more usernames and passwords for the protected resources on the Universal Login Form and submits it.
|
Credential Groups
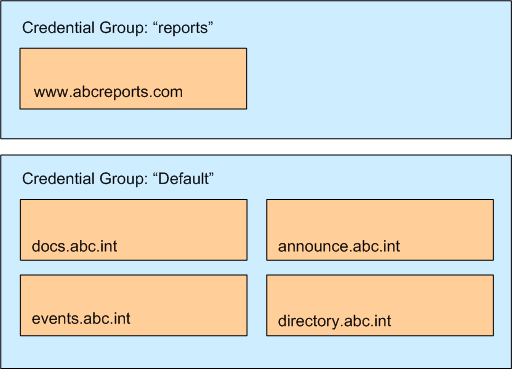
A credential group represents the set of authentication mechanisms that share a username and password. Credential groups enable the search appliance to gather user credentials by using the Universal Login Form.
|
•
|
www.abcreports.com uses forms authentication. This domain hosts business reports that are available for purchase.
|
|
•
|
documentation.abc.int uses forms authentication. This domain hosts design documents for use by internal employees.
|
|
•
|
events.abc.int uses HTTP Basic authentication. This domain contains information about internal company events
|
|
•
|
announce.abc.int uses forms authentication. This domain contains announcements for employees.
|
|
•
|
directory.abc.int uses forms authentication. This domain provides phone and office location information about employees.
|
The domain www.abcreports.com uses one, unique set of credentials (user name and password). All the other domains share a different single set of credentials.
For information about setting up credential groups, see Working with Credential Groups.
Primary Verified Identity
|
4.
|
|
6.
|
Universal Login Form
After credential groups are configured, whenever a user performs a secure search, and the user is not already authenticated, the Google Search Appliance presents the Universal Login Form, shown in the following figure. The Universal Login Form is the primary way the search appliance gathers user credentials (usernames and passwords). The user’s credentials are applied to all the systems in the credential groups for which the user supplies a username and password.
The Universal Login Form can contain multiple sets of user name and password fields—one set for each credential group.
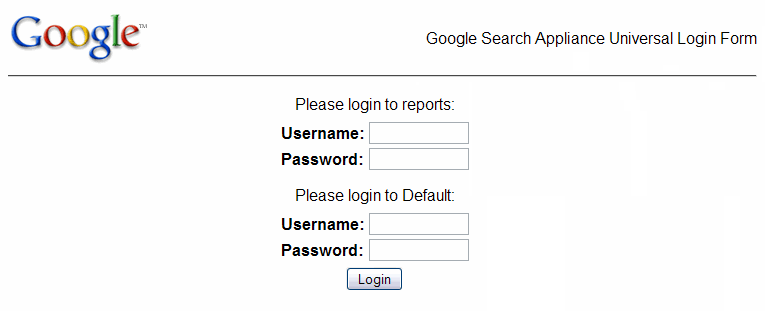
You can use the default Universal Login Form or create one that is specific to your organization. For more information, see Customizing the Universal Login Form.
Credential Group Satisfaction
The following process gives an overview of how the Universal Login Form determines if a user’s credentials satisfy configured credential groups:
|
1.
|
The Universal Login Form checks the existing cookies that the user already has to see whether its configured credential groups are already satisfied. The authentication mechanism can return one of three answers: verified, rejected, or indeterminate (which usually means an error occurred and a definitive answer couldn’t be found). If any mechanism answers “rejected,” the credential group is not satisfied.
|
|
2.
|
If all credential groups are satisfied, the Universal Login Form is skipped and appropriate results are displayed.
|
|
3.
|
The Universal Login Form presents a challenge for each configured-but-unsatisfied credential group.
|
|
4.
|
The user enters her credentials for each unsatisfied credential group on the Universal Login Form.
|
|
5.
|
The Universal Login Form attempts to verify each provided credential, and updates which credential groups are satisfied.
|
|
6.
|
If any credential groups remain unsatisfied, the Universal Login Form is presented again (with only the unsatisfied credential group’s enabled), up to three times.
|
Options that you, as the search appliance administrator, choose when configuring a credential group determine whether the user must enter credentials on the Universal Login Form to view search results. For more information about this topic, see Creating Credential Groups.
Working with Credential Groups
About the Default Credential Group
The Google Search Appliance provides a built-in credential group named Default. You can configure the Default credential group, as described in Creating Credential Groups and Configuring Credential Groups. If you plan on using credential groups and policy ACLs, configure the Default credential group but do not rename it. For more information, see Using Credential Groups with Policy ACLs.
Create a new credential group by using the Search > Secure Search > Universal Login page in the search appliance Admin Console. For information about creating and maintaining credential groups, click Admin Console Help > Search > Secure Search > Universal Login.
For each credential group that you create, you can choose two options:
The following sections describe these options.
The Require a user-name for this credential group? option ensures that the system has a username for an authenticated user. This option is important when your configuration uses cookie-based authentication in combination with an authorization mechanism that requires user-names, such as policy ACLs, SAML, and connectors.
If a user presents pre-existing cookies that are sufficient for access to configured sample URLs, but no cookie cracker is in use (see Using Cookie Cracking), the search appliance does not know the user’s name. In this case, if the box is checked, the credential group is not pre-satisfied, even if the sample URL check succeeds, and a Universal Login Form is presented to the user. If a user-name is available, from a different authentication mechanism, a previous Universal Login Form, or a cookie cracker, then the group can be pre-satisfied, and if all credential groups are pre-satisfied, then the Universal Login Form is skipped altogether.
The Group is optional? option controls the behavior of the Universal Login Form.
If this option is checked, the user is not required to type a username and password in the Universal Login Form for this credential group. The user can submit the Universal Login Form and view search results. However, if the user does not login, then search results do not include secure results protected by that credential group.
If this option is not checked, the user is required to type a username and password in the Universal Login Form. The user cannot view any search results until he has supplied his username and password. He will keep being sent back to the Universal Login Form until he provides the correct credentials.
To create a new credential group:
|
1.
|
Click Search > Secure Search > Universal Login.
|
|
2.
|
In the Credential Group Name box, type a name for the new credential group.
|
|
3.
|
(Optional) Type the name that you want to appear on the Universal Login form in the Credential Group Display Name box. There are no character or format restrictions on the Credential Group Display Name.
|
|
4.
|
Select Require a user-name for this credential group? and Group is optional?, as described in the preceding sections.
|
|
5.
|
Click Save.
|
The new credential group’s name appears in the list of credential groups.
Configuring Credential Groups
After you create a new credential group, you can configure it by adding credential group rules on the Search > Secure Search > Universal Login Auth Mechanisms page. This page provides tabs for a adding rules for the following types of authentication mechanisms:
|
•
|
Cookie-Based Authentication
Configuring a Credential Group for Cookie-Based Authentication
Configure a credential group rule for cookie-based authentication by supplying a URL pattern and sample URL on the Search > Secure Search > Universal Login Auth Mechanisms > Cookie page in the Admin Console. Optionally, you can also supply a redirect URL.
Each sample URL is checked before the Universal Login Form is presented, to determine if the user’s initial set of cookies can “pre-satisfy” any or all credential groups. In additional, if any cookie-based authentication methods are defined, the search appliance uses credentials gathered in the Universal Login Form to gather cookies and then uses those cookies to retrieve the sample URL page. If the retrieval is successful, the credentials are verified as correct. If a user has the correct cookies, content is presented.
If a user does not have the correct cookies, the sample URLs page should redirect to the forms-based login system. To enable the sample URL to send a redirect response that leads to a login form, check When sample URL fails, expect the sample page to redirect to a form, and log in to that form on the Search > Secure Search > Universal Login Auth Mechanisms > Cookie page.
For the URL pattern http://www.abcreports.com/, an example of a sample URL is http://www.abcreports.com/standard.html.
If you supply a redirect URL, the authentication mechanism changes significantly. In non-redirect mode, the search appliance transfers a username / password from the Universal Login Form to a login form found when attempting to retrieve the sample URL. With a redirect URL, the search appliance will automatically redirect to that URL. The service at that URL can then authenticate the user in whatever way it wishes. Upon completion of that authentication, the service at the redirect URL should grant a cookie to the user which provides access to secure content (and to the sample URL, if provided), and redirect the user back to the search appliance.
Possible advantages of redirect URL authentication:
Disadvantages of redirect URL authentication:
On balance, Google does not recommend using a redirect URL as a preferred method of authentication.
Adding a Credential Group Rule for Cookie-Based Authentication
To add a credential group rule for cookie-based authentication:
|
1.
|
Click Search > Secure Search > Universal Login Auth Mechanisms > Cookie.
|
|
3.
|
Optionally, click When sample URL check fails, expect the sample page to redirect to a form and log in to that form.
|
|
4.
|
In the Mechanism Name box, type a unique name for the authentication mechanism. A mechanism name must not be the same as another mechanism name or credential group name. Mechanism names are case-sensitive and can be up to 200 characters long, and can contain only alphanumeric characters, underscores, and hyphens. A name cannot begin with a hyphen.
|
|
5.
|
Type a sample URL for the site in the Sample URL box.
|
|
6.
|
Optionally, type a URL in the Redirect URL box.
|
|
7.
|
Optionally, type a Return URL Parameter.
|
|
8.
|
|
9.
|
|
10.
|
Click Save.
|
For more information about how to configure a credential group for cookie-based authentication, click Admin Console Help > Search > Secure Search > Universal Login Auth Mechanisms > Cookie.
Multiple Cookie Domains
Cookie-Based Authentication Scenarios
Different organizations set up cookie-based authentication rules for the Google Search Appliance’s Universal Login in a variety of different ways. The selections that you, as a search appliance administrator, make by using the Admin Console depend on your system’s capabilities and your organization’s requirements. For examples of setting up cookie-based authentication, see Cookie-Based Authentication Scenarios.
HTTP-Based Authentication
During serve, secure content from sites that were crawled by using user accounts and passwords entered on the Content Sources > Web Crawl > Secure Crawl > Crawler Access page are handled by HTTP-based authentication.
Configuring a Credential Group for HTTP Basic or NTLM
Configure a credential group for HTTP-based authentication or NTLM by supplying a URL pattern and sample URL on the Search > Secure Search > Universal Login Auth Mechanisms > HTTP page in the Admin Console. To configure an authentication domain that is protected by NTLM instead of HTTP Basic, click the NTLM check box.
Each sample URL is checked before the Universal Login Form is presented, to determine if the user’s initial set of cookies can “pre-satisfy” any or all credential groups. In additional, if any SSO Forms methods are defined, the search appliance uses credentials gathered in the Universal Login Form to gather cookies and then uses those cookies to retrieve the sample URL page. If the retrieval is successful, the credentials are verified as correct.
For the URL pattern http://www.abcreports.com/, an example of a sample URL is http://www.abcreports.com/status.html.
You can set up silent authentication with a sample URL page when the Require a user-name for this credential group? option is selected on the Search > Secure Search > Universal Login page by using cookie cracking. With silent authentication, users are authenticated without being directed to a login page. For information about this topic, see Using Cookie Cracking.
Adding a Credential Group Rule for HTTP Basic
To add a credential group rule for HTTP Basic authentication:
|
1.
|
Click Search > Secure Search > Universal Login Auth Mechanisms > HTTP.
|
|
3.
|
In the Mechanism Name box, type a unique name for the authentication mechanism. A mechanism name must not be the same as another mechanism name or credential group name. Mechanism names are case-sensitive and can be up to 200 characters long, and can contain only alphanumeric characters, underscores, and hyphens. A name cannot begin with a hyphen.
|
|
4.
|
Type a sample URL for the site in the Sample URL box.
|
|
5.
|
|
6.
|
|
7.
|
Click Save.
|
Adding a Credential Group Rule for NTLM
To add a credential group rule for NTLM authentication:
|
1.
|
Click Search > Secure Search > Universal Login Auth Mechanisms > HTTP.
|
|
3.
|
Click the NTLM check box.
|
|
4.
|
In the Mechanism Name box, type a unique name for the authentication mechanism. A mechanism name must not be the same as another mechanism name or credential group name. Mechanism names are case-sensitive and can be up to 200 characters long, and can contain only alphanumeric characters, underscores, and hyphens. A name cannot begin with a hyphen.
|
|
5.
|
Type a sample URL for the site in the Sample URL box.
|
|
6.
|
|
7.
|
|
8.
|
Click Save.
|
For more information about how to configure a credential group for HTTP-based authentication or NTLM, click Admin Console Help > Search > Secure Search > Universal Login Auth Mechanisms > HTTP.
Client Certificate-Based Authentication
Enabling User Authentication by X.509 Certificate
To enable user authentication by X.509 certificate, the search appliance must have a digital certificate that permits crawl and serve over HTTPS. Also, client certificate authentication cannot be used for the head requestor, therefore configure policy ACLs (see Policy Access Control Lists) or the SAML authorization SPI (see How to Exclude Controlled-Access Content Sources from Search). The preloaded certificate authorities are enabled by default. You can disable them or re-enable them.
|
2.
|
Choose Administration > SSL Settings. Configure the search appliance to permit crawl and serve over HTTPS by installing an SSL certificate. For details, see Configuring Crawl and Serve Over HTTPS.
|
|
3.
|
On the Administration > SSL Settings page, check the settings for Force secure connections when serving?
|
|
4.
|
Choose Administration > Certificate Authorities. Under Add more Certificate Authorities, enter the .pem file that contains your root CA certificate. The search appliance will trust certificates issued by this root certificate.
|
|
5.
|
Choose Administration > Certificate Authorities. Under Add Certificate Revocation List, enter the file that contains the current certificate revocation list (CRL). The search appliance will NOT trust certificates that appear in this list. The CRL prevents a user with a revoked certificate from accessing secure content.
|
|
6.
|
Optionally, to disable default certificate authorities, clear the Enable default Certificate Authorities checkbox under Default Certificate Authorities.
|
|
7.
|
Click Save.
|
Configuring a Credential Group for Client Certificate-Based Authentication
To add a credential group rule for client certificate-based authentication to a credential group:
|
1.
|
Click Search > Secure Search > Universal Login Auth Mechanisms > Client Certificate.
|
|
3.
|
Click Enable client certificate authentication support.
|
|
4.
|
In the Mechanism Name box, type a unique name for the authentication mechanism. A mechanism name must not be the same as another mechanism name or credential group name. Mechanism names are case-sensitive and can be up to 200 characters long, and can contain only alphanumeric characters, underscores, and hyphens. A name cannot begin with a hyphen.
|
|
5.
|
Click Save.
|
Kerberos-Based Authentication
Kerberos supports the following encryption methods:
|
•
|
To ensure that a search appliance uses Kerberos during serving, content sources must be enabled for Kerberos. For more information on ensuring that Kerberos is configured correctly on Windows content sources, see the wiki page http://code.google.com/p/google-saml-bridge-for-windows/wiki/ConfigKerberos (the information is provided as a reference, and is not officially supported by Google).
The Kerberos implementation supports:
The Kerberos implementation does not support:
|
•
|
|
•
|
To configure the search appliance to use IWA / Kerberos authentication:
|
1.
|
Enroll the search appliance in the domain managed by your KDC (see Enrolling the Search Appliance in the KDC Domain and Creating a Keytab File). The KDC is typically a Microsoft Windows Server acting as a domain controller. As part of this step, you must also request and register a Kerberos key table, called a keytab file.
|
|
2.
|
|
3.
|
Enrolling the Search Appliance in the KDC Domain and Creating a Keytab File
Instructions for Microsoft Windows 2003, 2008, XP, and 7 (All Encryption types)
|
•
|
|
3.
|
Open the properties for the user. Use the Account tab for the search appliance account to modify and apply the following properties:
|
|
b.
|
If the account does not use DES, clear the checkbox labeled Use DES encryption types for this account.
|
|
d.
|
If permitted by your security policies, set Password never expires.
|
ktpass -princ HTTP/FQDN_of_the_searchappliance@DOMAIN_NAME
-mapuser DOMAIN_NAME\searchappliance_username
-pass searchappliance_password -out filename.keytab -ptype KRB5_NT_PRINCIPAL -crypto ALL
Note: The search appliance username, password, and domain must be consistent with the user account that you created in step 2. With the exception of the mapuser switch, domain names must be fully qualified. Ensure that when you issue the ktpass command, HTTP is in upper-case letters and the string FQDN_of_the_search_appliance is in lower-case letters, as shown in the examples in this section. The FQDN_of_the_search_appliance must be the DNS A-name for the search appliance, not the CNAME. The ptype parameter specifies the principal type. The value must be KRB5_NT_PRINCIPAL (general ptype).
ktpass -princ HTTP/gsa.foodomain.com@FOODOMAIN.COM
-mapuser FOODOMAIN\gsa_account -pass 123pass -out myfilename.keytab
-ptype KRB5_NT_PRINCIPAL -crypto ALL
|
6.
|
At the command prompt, enter the following command, where demo.keytab is the keytab name. This lists encryption types so you can verify that all required types are included:
|
klist -ke demo.keytab
KVNO Principal
---- -----------------------------------------------------------------------
3 HTTP/search.mydomain.com@MYDOMAIN.COM (DES cbc mode with CRC-32)
3 HTTP/search.mydomain.com@MYDOMAIN.COM (DES cbc mode with RSA-MD5)
3 HTTP/search.mydomain.com@MYDOMAIN.COM (ArcFour with HMAC/md5)
3 HTTP/search.mydomain.com@MYDOMAIN.COM (AES-256 CTS mode with 96-bit SHA-1 HMAC)
3 HTTP/search.mydomain.com@MYDOMAIN.COM (AES-128 CTS mode with 96-bit SHA-1 HMAC)
|
7.
|
If Kerberos will be used for authorization, open the search appliance user account properties again. On the Delegation tab of User properties, select Trust this user for delegation to any service.
|
|
8.
|
On the Account tab of User properties, verify that the user logon name field was populated with the HTTP/ prefix, for example, HTTP/FQDN_of_the_search_appliance.
|
Configuring a Credential Group for Kerberos-Based Authentication
To configure Kerberos-based authentication in the Admin Console:
|
2.
|
Choose Search > Secure Search > Universal Login Auth Mechanisms > Kerberos.
|
|
3.
|
Under Specify a Kerberos Key Distribution Center (KDC)/Windows Domain Controller (DC), type the KDC host domain name in the Kerberos KDC Hostname box.
|
|
4.
|
Optionally, to enable cross-domain access, click the Enable KDC DNS Lookup checkbox.
|
|
5.
|
Click the Save Kerberos KDC Hostname button.
|
|
6.
|
Under Import a Kerberos Service Key Table (“keytab”) File, type the path name for the keytab file in the Keytab File Name box or click Browse to navigate to the file.
|
|
7.
|
Click the Import Kerberos Keytab File button.
|
|
9.
|
Click the Enable Kerberos support checkbox.
|
|
10.
|
In the Mechanism Name box, type a unique name for the authentication mechanism. A mechanism name must not be the same as another mechanism name or credential group name. Mechanism names are case-sensitive and can be up to 200 characters long, and can contain only alphanumeric characters, underscores, and hyphens. A name cannot begin with a hyphen.
|
|
11.
|
If the KDC is using single-DES encryption, click Allow Weak Crypto.
If you do not check this box and you try to enable Kerberos-based authentication with a KDC using single-DES encryption, an error message appears. |
|
12.
|
Click Save.
|
For more information about how to configure Kerberos based authentication, click Admin Console Help > Search > Secure Search > Universal Login Auth Mechanisms > Kerberos.
Configuring Web Browsers for Kerberos Authentication
Safari is not a supported browser because it does not forward Kerberos tickets. You can find more information about this issue at http://openradar.appspot.com/6644527.
To configure Internet Explorer:
|
1.
|
|
2.
|
The search appliance URL must be defined in the Local Intranet zone or the Trusted Sites zone. If the search appliance is already part of the Trusted or Intranet zones, you can skip this step.
|
|
a.
|
|
b.
|
|
c.
|
|
d.
|
Leave the Require server verification (https:) for all sites in this zone setting as it is. This option controls whether communication with the search appliance requires SSL certificates. For more on certificate use, see Configuring Crawl and Serve Over HTTPS.
|
|
e.
|
|
f.
|
With Local Intranet zone selected, click the Custom level ... button and verify that Automatic logon only in Intranet zone is checked.
If you cannot include the search appliance in the Local Intranet zone, add it to the Trusted Sites zone and select Automatic logon with current user and password. |
|
3.
|
Choose the Advanced tab.
|
|
4.
|
Under Security, select the checkbox labeled Enable Integrated Windows Authentication (requires restart). This sets the browser to use Kerberos authentication.
|
|
5.
|
Click OK and restart Internet Explorer.
|
|
2.
|
|
3.
|
Double-click network.negotiate-auth.trusted-uris. Modify this parameter to include the search appliance’s URL as a trusted URI.
|
|
4.
|
Double-click network.negotiate-auth.delegation-uris. Modify this parameter to include the search appliance’s URL as a delegation URI.
|
|
5.
|
If you are using a Microsoft Windows domain controller and you are running Mozilla Firefox on Microsoft Windows, verify that network.auth.use-sspi is set to true, which is its default value.
|
Note: For more on Mozilla and integrated authentication, see http://www.mozilla.org/projects/netlib/integrated-auth.html.
If Google Chrome is running on Windows and the GSA is in the local Intranet zone, configuration is not required for Kerberos. Select Local Intranet zone, click the Custom level... button and verify that Automatic logon only in Intranet zone is checked.
To configure Google Chrome in a non-Windows environment:
Note: For more information on Chrome command line switches, see: http://www.chromium.org/developers/how-tos/run-chromium-with-flags. For more information on Authentication in Chrome, see: http://dev.chromium.org/developers/design-documents/http-authentication.
More Kerberos Information
For more information about the Google Search Appliance and Kerberos, see the following documents:
|
•
|
|
•
|
The SAML Authentication Service Provider Interface (SPI)
This section describes the Authentication SPI. For information about the Authorization SPI, see How to Exclude Controlled-Access Content Sources from Search. For more detailed information about how the Authentication and Authorization SPIs work, see the Authentication/Authorization for Enterprise SPI Guide.
Before using the Authentication and Authorization SPI, you must configure the appliance to crawl and index some secure controlled-access content. For more information, see Configuring Crawl for the SAML Authentication and Authorization Service Provider Interface. The SPIs are only used when a user queries for secure results.
Configuring a Credential Group for SAML Authentication
You can add a rule for SAML authentication to a credential group by specifying the Entity ID and login URL of the Identity Provider on the Search > Secure Search > Universal Login Auth Mechanisms > SAML page in the Admin Console. Using this page, you can also specify the binding in which the search appliance communicates with the SAML server:
|
•
|
HTTP Artifact binding—To specify HTTP Artifact binding, enter an Artifact Resolver URL
|
|
•
|
HTTP POST binding—To specify HTTP POST binding, enter the Public Key of IDP
|
When creating credential groups for the authentication mechanism, ensure that Requires a User-Name is selected. For more information, see Require a User-Name Option.
Adding a Credential Group Rule for SAML Authentication
If there are additional credential groups besides the one with the SAML entry, the search appliance challenges the user with the Universal Login Form. After the user provides her credentials on the Universal Login Form, the search appliance combines the verified identities from SAML and the Universal Login Form. The user is granted access to the resources based on the combined credentials.
To add a credential group rule for SAML authentication to a credential group:
|
1.
|
Click Search > Secure Search > Universal Login Auth Mechanisms > SAML
|
|
3.
|
In the Mechanism Name box, type a unique name for the authentication mechanism. A mechanism name must not be the same as another mechanism name or credential group name. Mechanism names are case-sensitive and can be up to 200 characters long, and can contain only alphanumeric characters, underscores, and hyphens. A name cannot begin with a hyphen.
|
|
6.
|
Click Save.
|
For more information about how to add a rule for SAML authentication to a credential group, click Admin Console Help > Search > Secure Search > Universal Login Auth Mechanisms > SAML.
Connectors
Configuring a Credential Group for a Connector
To add a credential group rule for a connector instance:
|
1.
|
Click Search > Secure Search > Universal Login Auth Mechanisms > Connectors.
|
|
3.
|
In the Mechanism Name box, type a unique name for the authentication mechanism. A mechanism name must not be the same as another mechanism name or credential group name. Mechanism names are case-sensitive and can be up to 200 characters long, and can contain only alphanumeric characters, underscores, and hyphens. A name cannot begin with a hyphen.
|
|
5.
|
|
6.
|
|
7.
|
|
8.
|
Click Save.
|
For more information about how to configure an authentication domain for a registered connector instance, click Admin Console Help > Search > Secure Search > Universal Login Auth Mechanisms > Connectors.
For comprehensive information about connectors, see documentation for the Google Search Appliance connectors (http://support.google.com/gsa/answer/2731901).
LDAP
|
2.
|
|
4.
|
|
5.
|
Integrating the Search Appliance with an LDAP Server
To specify LDAP settings for the search appliance:
|
2.
|
Choose Administration > LDAP Setup.
|
|
3.
|
Click Create new LDAP Server. The LDAP setup options appear.
|
|
4.
|
In the LDAP Directory Server Address section, enter the following information:
|
|
•
|
Host—LDAP directory server’s host name, which is a fully-qualified domain name or an IPv4 address.
|
|
•
|
Port number (optional)—the port number where the LDAP server listens for requests.
|
|
•
|
Distinguished Name (DN)—A login on the LDAP server to which the search appliance connects to send authentication requests. If the LDAP server supports anonymous binds (authentication requests), you do not need to specify a DN.
|
|
•
|
Password (optional)—The password for the DN.
|
|
6.
|
(Optional) Click the Go to advanced settings page even if detection fails checkbox.
|
|
7.
|
Click Continue.
|
|
•
|
Superuser Group—Any member of this group is considered an Admin Console administrator.
|
|
•
|
Manager Group—Any member of this group is considered an Admin Console manager.
|
|
9.
|
Test the LDAP server settings for a potential search user by entering the following information in the LDAP Search User Authentication Test box and clicking Test LDAP Settings:
|
|
•
|
Username—The user name that enables the search appliance to connect to the LDAP server (relative to the search base)
|
|
•
|
Password—The password for the user name that enables the search appliance to connect to the LDAP server
|
uid - (user ID)
ou - (organizational unit)
dc - (company name)
|
10.
|
Test the LDAP server settings for administrator authentication by entering the following information in the LDAP Administrator Authentication Test box and clicking Test LDAP Settings:
|
|
•
|
Username—The administrator user name that enables the search appliance to connect to the LDAP server. (Relative to the search base.) To authenticate, the administrator must be a member of the LDAP Manager Group.
|
|
•
|
Password—The password for the administrator user name.
|
uid - (user ID)
ou - (organizational unit)
dc - (company name)
|
11.
|
After the LDAP Authentication Test is successful, click Save LDAP Settings.
|
|
12.
|
Open a search page in a browser or click Test Center, click public and secure content, and perform a search against the search appliance.
|
|
a.
|
Enabling LDAP Authentication for a Search Appliance
To enable LDAP on a search appliance, click the Enable Authentication checkbox on the Search > Secure Search > Universal Login Auth Mechanisms > LDAP page. For more information, see Configuring a Credential Group for LDAP.
Enabling Group Lookup
To enable group lookup, click the Enable group lookup checkbox on the Search > Secure Search > Universal Login Auth Mechanisms > LDAP page. For more information, see Configuring a Credential Group for LDAP.
Configuring a Credential Group for LDAP
To add a credential group rule, enable LDAP and automatic lookup of group information:
|
1.
|
Click Search > Secure Search > Universal Login Auth Mechanisms > LDAP.
|
|
3.
|
In the Mechanism Name box, type a unique name for the authentication mechanism. A mechanism name must not be the same as another mechanism name or credential group name. Mechanism names are case-insensitive and can be up to 200 characters long, and can contain only alphanumeric characters, underscores, and hyphens. A name cannot begin with a hyphen.
|
|
5.
|
Click the Enable Authentication checkbox.
|
|
6.
|
Click the Enable group lookup checkbox.
|
|
7.
|
|
8.
|
|
9.
|
Click Save.
|
Protecting the User’s Credentials for Serve with HTTP Basic and NTLM HTTP
To specify whether the search appliance serves all content over HTTPS:
|
2.
|
|
•
|
To return results in the protocol used by the original search query, choose No. This option is the least secure.
|
|
•
|
To force the search appliance to use HTTPS for secure content only, choose Use HTTPS when serving secure results, but not when serving public results.
|
|
•
|
To force the search appliance to use HTTPS for all content, choose Use HTTPS when serving both public and secure results. This option is the most secure.
|
|
3.
|
Click Save.
|
Using Silent Authentication
With silent authentication, users are authenticated without being directed to a login page. The following table lists methods that provide silent authentication. Some methods produce a primary verified identity (see Primary Verified Identity). Because a primary verified identity is required for policy ACLs (see Policy Access Control Lists), these methods can be used with them. The methods that do not produce a primary verified identity cannot be used with policy ACLs, SAML, or connectors.
|
If Require a user-name? (see Require a User-Name Option) is not checked, inbound cookie forwarding provides silent authentication without a primary verified identity; it cannot be used with policy ACLs, SAML, or connectors. If Require a user-name? (see Require a User-Name Option) is checked, then silent authentication can only be achieved with cookie cracking (see Using Cookie Cracking). |
|
Using Cookie Cracking
If a credential group requires a user name for an authenticated user, you can implement silent authentication for content in the credential group (see Credential Groups) by using cookie cracking. Google recommends using the Require a user-name? option (see Require a User-Name Option) when you are using policy ACLs, authorization results caching, SAML authorization, or connector authorization. When you use cookie cracking, inbound cookie forwarding (from the content server to the search appliance) provides a username and or group.
X-Username:value
X-Groups: value1, value2
where value becomes a verified identity for the credential group that is associated with the sample URL.
Using Perimeter Security
If the user cannot be authenticated, the search appliance doesn’t serve any results.
To configure perimeter security, use the Search > Secure Search > Universal Login page. For instructions for configuring perimeter security, click Admin Console Help > Search > Secure Search > Universal Login.
Authorization
Flexible Authorization
Flexible authorization gives you control over authorization by enabling you to:
You can configure rules for the following authorization mechanisms:
|
•
|
|
•
|
|
•
|
|
•
|
To configure rules for authorization mechanisms, use the Search > Secure Search > Flexible Authorization page. For step-by-step procedures for configuring specific types of rules, click Admin Console Help > Search > Secure Search > Flexible Authorization.
After the search appliance authenticates a user by establishing the user’s identity, the search appliance attempts to determine whether a user has access to the secure content that matches her search. The search appliance performs authorization checks by applying flexible authorization rules in the order in which they appear on the Search > Secure Search > Flexible Authorization page.
Policy Access Control Lists
For more information on policy ACLs, see the Policy ACL API Developer’s Guide.
Per-URL ACLs and Policy ACLs
The search appliance supports two types of access control lists:
|
•
|
Occasionally, a URL can be associated with both types of access control lists. You can choose which type takes precedence, as described in Flexible Authorization.
Methods for Adding ACLs to the Index
Crawling Per-URL ACLs
At crawl time, the search appliance can accept per-URL ACLs, along with documents, through the X-GSA-External-Metadata HTTP response header. To include a per-URL ACL, specify the names of the groups or users that have access. The metadata supplied at crawl time replaces any previously indexed metadata. Per-URL ACLs contained in an HTTP header are considered external metadata and will empty and replace any metadata from feeds. For more information about external metadata in HTTP headers, see External Metadata Sent in an HTTP Header in the External Metadata Indexing Guide.
To use this method of indexing per-URL ACLs, the web service that stores the content needs to be designed to generate the optional X-GSA-External-Metadata HTTP header. The header includes a comma separated list of encoded values in the following format:
X-GSA-External-Metadata: value_1, value_2,...
Where each value has the form meta-name=meta-value.
To specify a group, replace meta-name with google:aclgroups and meta-value with a single group name. For example, to specify engineering (“eng”) as the group that has access to the URL, use google:aclgroups=eng.
To specify a user, replace meta-name with google:aclusers and meta-value with a single user name. For example, to specify Maria as the user that has access to the URL, use google:aclusers=Maria.
Both the meta-name and the meta-value are encoded according to section 2 of RFC3986 (http://www.ietf.org/rfc/rfc3986.txt) (commonly known as percent-encoding). The following example shows an encoded header:
X-GSA-External-Metadata: google%3Aaclusers=Maria, google%3Aaclgroups=eng
Policy ACLs
A policy ACL is expressed as a rule based on URL patterns. A policy ACL rule has two parts:
|
•
|
URL Pattern to Protect (see URL Pattern to Protect)—A URL pattern that you want to protect with restricted access.
|
|
•
|
Allowed Users or Groups (see Allowed Users or Groups)—Lists the users or groups that have access to the restricted URL.
|
For example, suppose the eng (engineering) group is the only group that you permit to view all documents in the example.com/engsite page. To grant the engineering group access to the engsite page, specify a policy ACL rule:
example.com/engsite group:eng
^http://www.example.com/mypage.html$
The coarse-grained rules consist of:
<domain>/<prefix>
sales.example.com/products/
sales.example.com/products/mypage.html
sales.example.com/
Examples of general URL patterns are:
|
The product string can appear either in the host name, such as myproduct.com, or at the end of a URL and doesn’t have to be a full word. |
|
|
The URL has to contain a URL parameter with sid= followed by a value that contains either a digit or capital letter. The plus means one or more characters |
|
1.
|
Click Search > Secure Search > Policy ACLs.
|
|
2.
|
In the URL Patterns field, type the pattern of the URL you want to restrict.
|
|
3.
|
Click Create New Policy ACLs.
|
|
4.
|
Under Principal Name, type the name of a user or group that is permitted to view the URL.
|
|
5.
|
|
6.
|
Optionally, in the Domain box enter the domain name for the user or group.
|
|
7.
|
In the Namespace/Credential Group box, accept the default namespace/credential group for the principal or type a different namespace/credential group.
|
|
8.
|
If the principal name and domain are case sensitive, click the Case Sensitive? checkbox.
|
|
9.
|
Click Save.
|
To navigate to the previous page, click the Back to Policy ACL list link.
|
1.
|
Click Search > Secure Search > Policy ACLs.
|
|
2.
|
Click the Edit link next to the policy ACL rule you want to edit.
|
|
4.
|
Click Save.
|
|
1.
|
Click Search > Secure Search > Policy ACLs.
|
|
2.
|
Click the Delete link next to the policy ACL rule you want to delete.
|
Importing a Configuration File
Note: Before importing a configuration file, if you have defined policy ACL rules, click Export Search Results to back up your rules. The exported file is in the same format as a configuration file that you can import.
The format of each rule in the file is:
url_pattern allowed_user_or_group
Each line of the file must list only one URL pattern rule, and one or more users, denoted by the user: prefix or groups, denoted by the group: prefix, as shown in the following example:
example.com/docsite user:jane user:sue user:wilson group:chicagodoc group:texasdoc
mycompany.com/engsite group:eng
mycompany.com/salessite group:sales user:yvette
To import a file that contains policy ACLs:
|
1.
|
|
3.
|
Click Open.
|
|
4.
|
Click Import.
|
Importing and Updating Policy ACLs from an Earlier Release
To import and update policy ACLs:
|
2.
|
For each imported policy ACL, click the Edit link under Matching URL Patterns.
Observe that Principal Name and Principal Type are imported correctly and that default values are added for the Domain, Namespace/Credential Group, and Case Sensitive?. |
|
3.
|
|
4.
|
Click Save.
|
You can perform the following types of searches from the Policy pattern field on the Search > Secure Search > Policy ACLs page:
|
•
|
|
•
|
All Rules—List all rules or those that contain the text you specify in the Policy pattern field.
|
|
•
|
Exact-match Rules—List all exact-match rules or those exact-match rules that contain the text you specify in the Policy pattern field.
|
|
•
|
Coarse-grained Rules—List all coarse-grained rules or those coarse-grained rules that contain the text you specify in the Policy pattern field.
|
Search results appear under Matching URL Patterns.
After you search policy ACLs, you can export the search results as an XML file. To export search results, click Export Search Results. The exported file is in the same format as an import configuration file.
The default file name is policy_acl.xml.
Using Credential Groups with Policy ACLs
Policy ACLs require that the identity of a user has been verified by an authentication method. A credential group can be used to authenticate a user’s identity for a policy ACL. However, although you can configure multiple credential groups for a system, the search appliance only currently supports one verified identity (see Primary Verified Identity) from all the credential groups for policy ACLs. Generally, the Default credential group (see About the Default Credential Group) provides the primary verified identity for use with a policy ACL.
To use a credential group with a policy ACL:
|
•
|
The user in the policy ACL rule must match the identity in the Default credential group. For example, suppose the username in the Default credential group is “joe.” To ensure that the search appliance can use a policy ACL with this identity, ensure that there is a policy ACL rule with the user “joe.”
|
|
•
|
Check the Requires a Username option (see Require a User-Name Option) for the Default credential group.
|
|
•
|
Do not rename the Default credential group.
|
Enabling Late Binding for Policy ACLs and Per-URL ACLs
For information about enabling late binding for policy ACLs and per-URL ACLs, click Admin Console Help > Search > Secure Search > Flexible Authorization.
How to Exclude Controlled-Access Content Sources from Search
Excluding Controlled-Access Content from the Index
To exclude private content from the index, use one or both of these methods:
|
•
|
In the Admin Console, go to Content Sources > Web Crawl > Start and Block URLs. Scroll down to Do Not Follow Patterns and enter a pattern for each URL that corresponds to private content. Any content that matches the patterns under Do Not Follow Patterns is excluded from the index.
|
Removing Controlled-Access Content from Search Results
To stop serving undesired content immediately:
|
2.
|
|
•
|
In the list of Current Front Ends, click Edit for the front end that you want to modify.
|
|
•
|
On the Remove URLs tab, enter URL patterns to exclude the undesired controlled-access content. You can enter as many URL patterns as you need to exclude all the undesired content.
|
|
•
|
Click Update. The search appliance immediately ceases serving URLs that match these patterns.
|
To permanently remove undesired content from the index:
|
2.
|
Choose Content Sources > Web Crawl > Start and Block URLs. Scroll down to Do Not Follow Patterns and enter URL patterns that will exclude the undesired controlled-access content. You can enter as many URL patterns as you need to exclude all the undesired content.
|
|
3.
|
Click Save. The search appliance removes the undesired content when the crawler next runs.
|
|
4.
|
To verify that the content has been removed, go to Index > Diagnostics > Index Diagnostics and search for the removed URLs.
|
Customizing the Universal Login Form
By default, the Universal Login Form displays sections for logging in to each credential group, a Login button, and the Google logo. You can deploy the Universal Login Form with these features. However, by using the Search > Secure Search > Universal Login Form Customization page in the Admin Console, you can create a Universal Login Form that is specific to your organization.
For example, you can make the following types of changes to page elements:
|
•
|
|
•
|
Submit button text—You can change the Login button that appears at the bottom of the form, by changing the default text string (“Login”).
|
Alternatively, you can also upload HTML for a completely different Universal Login Form.
Using the Page Layout Helper
The Page Layout Helper enables you to customize the Universal Login Form without directly editing any HTML. The Page Layout Helper contains the areas described in the following table.
|
Enter the name of the font family that you want to use, for example, Arial. |
|
|
To replace the word “Login” on the button, type the text that you want to appear in the button. |
|
To open a browser window to see how the page will look when you save your changes, click Preview. Changes are not saved until you click Save.
To customize the Universal Login Form by using the Page Layout Helper:
|
1.
|
Click Search > Secure Search > Universal Login Form Customization.
|
|
2.
|
|
3.
|
|
4.
|
Click Save.
|
Creating a Fully Customized Universal Login Form
The easiest way to create a fully custom Universal Login Form is by:
|
1.
|
Setting up a search appliance to use the Universal Login Form.
|
|
2.
|
Running a secure search to display the default Universal Login Form.
|
|
3.
|
Using your browser’s view source feature to view and save the HTML of the default Universal Login Form.
|
|
4.
|
Using the HTML of the default Universal Login Form as a starting point for customizing your own form.
|
The Universal Login Form HTML must contain HTML form field names that match the system’s expectations. For example, for a credential group named cg1:
If a credential group is already satisfied at the time the Universal Login Form is rendered, the Universal Login Form attempts to disable the login fields for the already-satisfied group(s). It does this in the following two ways:
<!--
#cg1Active {display:none; }
#cg1Inactive {display:inline; }
#cg2Active {display:inline; }
#cg2Inactive {display:none; }
-->
<tr id="cg1Active"><td>Please login to cg1:</td></tr>
<tr id="cg1Inactive"><td><span style="color:green">Logged in to cg1</span></td></tr>
To upload HTML for a customized Universal Login Form:
|
1.
|
Click Search > Secure Search > Universal Login Form Customization.
|
|
2.
|
Insert the customized HTML in the Custom Page HTML area of the Page Layout Helper.
|
|
3.
|
Click Save.
|
For more information about customizing the Universal Login Form, click Admin Console Help > Search > Secure Search > Universal Login Form Customization.